
In the ever-evolving world of nail art, fruit-inspired designs have emerged as a sophisticated yet playful trend that transcends seasonal boundaries. While classic French manicures maintain their timeless appeal, these nature-inspired creations offer a fresh perspective on self-expression through detailed artistry.
From subtle watermelon wedge tips to elaborate pomegranate seed patterns, each design presents unique opportunities to showcase both technical skill and creative flair. As we explore these twenty-two distinctive looks, you’ll discover how simple fruits can transform into elegant statements that complement any style or occasion.
Watermelon Wedge French Tips

Creating watermelon-inspired French tips transforms classic manicures into playful summer designs. This fresh take on traditional French manicures combines pink and green hues with delicate black accents to capture the essence of everyone’s favorite summer fruit.
To achieve this look, start with a clear base coat and paint classic French tips using OPI’s “Strawberry Margarita” or similar coral-pink polish. “The key to watermelon tips is creating a thin green rind using a striper brush and mint green polish,” explains Sarah Chen, nail artist at Gloss & Polish Studio. After the pink tips dry completely, carefully paint a thin green curve along the pink edge using Essie’s “Mojito Madness.”
The final touch involves adding tiny black seeds using a dotting tool or thin brush with black polish. Celebrity manicurist Tom Bachik notes, “Space the seeds irregularly for a more natural appearance, and seal everything with a high-shine top coat.” For best results, use quick-dry drops between layers and allow 2-3 minutes of drying time between each step to prevent smudging.
Tiny Lemon Dots

For added dimension, consider mixing two yellow shades – one lighter and one slightly darker – to create depth in your lemon dots. Apply a white underlayer beneath the dots to make the yellow pop more vibrantly against your natural nail.
Seal the design with a high-gloss top coat, which not only protects your artwork but also gives the dots a fresh, dewy appearance reminiscent of morning citrus. This subtle design works particularly well for office settings or when you want understated nail art.
Strawberry Fields Forever

Add tiny black dots using a dotting tool to create the strawberry seeds, spacing them evenly across the red surface.
For the finishing touch, paint small green leaves at the top using a fine detail brush – Essie’s “Pretty Edgy” provides the ideal leaf color.
Seal your design with a high-gloss top coat to guarantee longevity. “The key to successful strawberry nail art lies in the details,” advises Chen, “particularly in creating symmetrical shapes and maintaining consistent sizing across all nails.”
Citrus Rainbow Gradient

Looking to brighten your manicure with vibrant citrus hues? The Citrus Rainbow Gradient nail design combines the zesty appeal of lemons, limes, oranges, and grapefruits in a stunning ombré effect that’s perfect for summer.
Celebrity nail artist Maria Chen explains, “The key to achieving the perfect citrus gradient is selecting complementary polish shades and using a makeup sponge for seamless color shifts.” Start with a white base coat, then choose four citrus-inspired polishes: pale yellow (like OPI’s “Bee-hind the Scenes”), lime green (Essie’s “The Cost of Good Lime”), orange (Sally Hansen’s “Sun-kissure”), and coral pink (Zoya’s “Sawyer”).
Apply thin stripes of each color onto a latex-free makeup sponge, slightly overlapping each shade. Gently dab the sponge onto your nail, rolling it slightly to blend the colors. “For best results, apply two to three layers of the gradient effect,” recommends Chen. Seal your design with a high-shine top coat, and don’t forget cuticle oil to keep your nail beds healthy. This eye-catching design typically lasts 7-10 days with proper application and maintenance.
Pineapple Paradise

For the crown, paint small green triangular leaves at the nail tip using essie’s “Pretty Edgy” or a similar emerald shade. Add dimension by incorporating lighter green highlights within each leaf. “The key to realistic-looking pineapple nail art lies in the varying shades of green in the crown,” notes professional nail educator Sarah Thompson.
Complete the look with a high-shine top coat to seal your tropical masterpiece and extend its wear time.
Also Read: 17 Chic Square Fall Nail Ideas
Cherry Blossom Accent

Add dimension to your cherry blossoms by dotting darker pink polish in the center of each flower, and create thin brown branches using a nail art pen or toothpick.
For added authenticity, incorporate a few scattered petals appearing to float down the nail. Seal your design with a high-quality top coat – Seche Vite’s Quick-Dry formula comes highly recommended by professionals for preserving intricate details without smudging.
Orange Slice Swirls

To achieve realistic-looking segments, use a fine-tipped nail art brush to draw delicate white lines between the orange sections, creating that characteristic citrus pulp appearance. Add dimension by incorporating subtle white dots within each segment using a dotting tool.
For the finishing touch, apply a clear topcoat with UV protection, such as OPI’s Infinite Shine, to seal and protect your design. As noted in Nail Pro Magazine, “The key to successful fruit-inspired nail art lies in balanced proportions and precise line work.”
Dragon Fruit Dreams

For an enhanced 3D effect, apply a clear topcoat between dot layers, building depth that catches the light. Consider adding subtle shimmer with a pearlescent overlay, or incorporate neon pink accents along the nail tips to reference the fruit’s vibrant flesh.
Popular products for achieving this look include OPI’s “Bubble Bath” for the base and Essie’s “Licorice” for the spots. Remember to seal your design with a quality top coat to guarantee longevity and shine.
Grape Vine Elegance

Professional nail technician Sarah Wong recommends, “Seal your grape design with a quick-dry top coat that contains fine shimmer particles to create dimension and depth.” For best results, use products like Essie’s “Good to Go” top coat with ORLY’s “Purple Crush” and “Royal Navy” for the grapes.
This design typically lasts 7-10 days with proper application and maintenance, making it an excellent choice for special events or seasonal styling.
Kiwi Half Moons

For best results, use OPI’s “Suzi Loves Cowboys” for the brown exterior, Essie’s “Mojito Madness” for the vibrant green flesh, and any basic black polish for the seeds.
Professional nail technician Sarah Wong notes, “This design works particularly well on longer nails, as the extra space allows for more detailed seed placement and better fruit proportion representation.”
Mixed Fruit Medley

The technique requires dotting tools for creating perfect circles (for oranges and berries) and a thin striping brush for details like watermelon seeds and kiwi texture.
For best results, seal your fruity masterpiece with a high-quality gel topcoat such as Seche Vite’s Quick Dry formula, which prevents smudging and extends wear time to 7-10 days.
Remember to let each fruit element dry completely before adding intricate details or topcoat.
Minimalist Apple Outlines
Minimalist apple designs bring elegant simplicity to nail art through clean, single-line drawings. According to celebrity nail artist Maria Chen, “The beauty of minimalist fruit designs lies in their understated charm and versatility across seasons.” These delicate outlines, typically created with a fine-line nail brush, can transform basic manicures into sophisticated statements.
To achieve the perfect apple outline, start with a neutral base coat like Essie’s “Blanc” or OPI’s “Alpine Snow.” Once dry, use a thin striper brush and red nail polish diluted with clear polish for ideal flow control. “The key is maintaining steady pressure while drawing continuous curved lines,” explains Julie Park, lead educator at The Nail Academy. Create the apple’s silhouette with a single stroke, adding a small stem and leaf detail in dark green.
For best results, seal your minimalist apple design with a high-quality top coat like Seche Vite, which prevents smudging and extends wear time. This understated fruit motif pairs beautifully with both casual and formal attire, making it a versatile choice for any occasion. Professional nail technicians recommend practicing the outline on paper before attempting it on nails.
Neon Fruit Punch
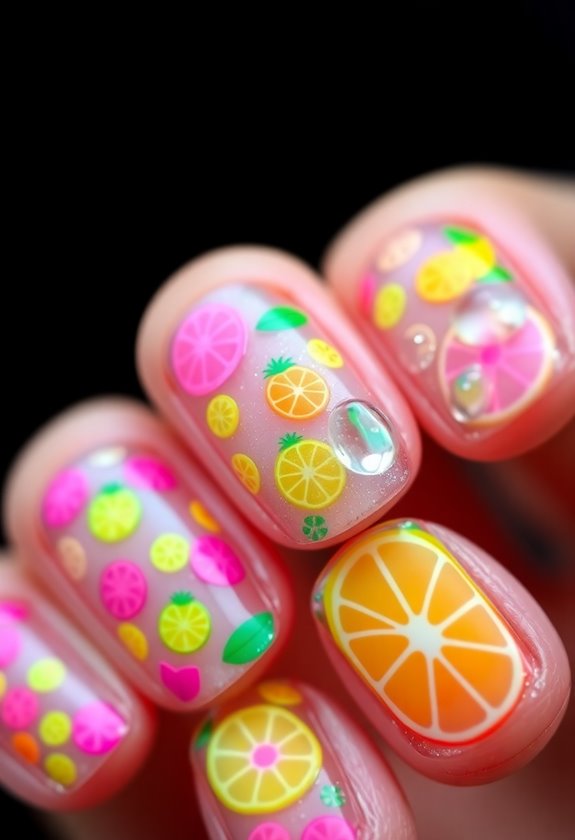
For best results, seal each fruit design with a UV-cured top coat, which prevents the neon pigments from fading. Add miniature white dots for seeds and highlights, creating depth and authenticity.
This playful design works especially well on longer nail beds but can be modified for shorter lengths by focusing on smaller, singular fruit elements per nail.
Negative Space Fruit

Apply your chosen fruit colors around the taped sections, carefully peeling the tape away while the polish is still slightly wet. For best results, use quick-drying formulas like Essie’s Gel Couture or OPI Infinite Shine.
The negative space should represent approximately 30-40% of the nail surface, creating a balanced composition that’s both playful and sophisticated. Seal the design with a high-gloss top coat to enhance the contrast between painted and bare sections.
Pastel Peach Tips

For enhanced durability, seal your design with a gel-like topcoat such as Seche Vite’s Quick Dry formula. “The glossy finish not only protects the design but also gives the peach tips that fresh, juicy appearance,” explains nail technician Maria Rodriguez.
This versatile style typically lasts 7-10 days with proper application and maintenance, making it an excellent choice for those seeking a subtle fruit-inspired design.
Tropical Fruit Patterns

Vibrant tropical fruit patterns offer a bold and playful twist on traditional nail art designs. According to celebrity nail artist Maria Chen, “Tropical fruits like pineapples, watermelons, and kiwis create eye-catching patterns that instantly elevate any manicure.” These whimsical designs work particularly well during summer months but can brighten any season.
To create tropical fruit patterns, start with a solid base color that complements your chosen fruit design. For pineapples, apply a yellow base coat, then use a thin brush to create crosshatching patterns in golden brown. Professional nail technician James Rodriguez recommends, “Using acrylic paint instead of nail polish for detailed work, as it’s easier to control and doesn’t dry as quickly.” Tiny dots of green polish can create leafy accents at the tips.
For watermelon designs, paint diagonal stripes in pink and white, adding small black seeds using a dotting tool. Kiwi patterns require a brown base with tiny black dots scattered throughout, surrounded by a light green circle. Top each design with a high-gloss topcoat like Seche Vite for lasting wear and professional shine.
Also Read: 33 Trendy Green Nail Ideas
Golden Pear Art

For enhanced detail, incorporate delicate leaf elements at the pear’s stem using Zoya’s “Hunter” green polish, and consider adding minimal texture with gold microbeads along the fruit’s curves. The design works particularly well on accent nails, paired with solid metallic finishes on remaining fingers.
Top manicurists recommend sealing the artwork with a high-gloss topcoat like Seche Vite for lasting wear and professional shine. This sophisticated fruit motif has gained popularity among minimalist nail enthusiasts seeking elevated botanical designs.
Fruit Salad Splatter

Layer different colors and sizes of dots, keeping some areas more concentrated than others. Add tiny black seeds or white highlights to suggest recognizable fruit elements without being too literal. Seal the design with a high-gloss top coat to enhance the fresh, juicy appearance.
According to the International Nail Technicians Association, this technique ranks among the top trending designs for summer, particularly popular among younger clients seeking playful, abstract nail art.
Coconut Palm Designs

Tropical serenity comes to life through elegant coconut palm nail designs, featuring delicate fronds and subtle beach-inspired elements. This sophisticated nail art transforms your fingertips into miniature vacation scenes, combining earthy greens with sandy neutrals for a balanced, resort-worthy look.
Celebrity nail artist Maria Chen explains, “The key to realistic palm designs lies in creating varied brush strokes that mimic natural frond movement.” Start with a cream or pale beige base coat, allowing it to dry completely. Using a fine-tipped nail brush, paint thin, dark green lines radiating from a central point to form the palm’s stem. Layer lighter green strokes over these lines, creating dimension and texture.
For added authenticity, incorporate tiny coconuts using white dotting tools, and consider adding metallic accents to represent sunlight filtering through the leaves. “The most common mistake is overcrowding the design,” notes professional manicurist James Liu, NCEA certified. “Leave negative space to let the pattern breathe.” Seal your tropical masterpiece with a high-quality top coat, ensuring your palm paradise stays perfect for up to two weeks.
Raspberry Glitter Tips

Sparkling with the essence of summer berries, raspberry glitter tips bring a bold and sophisticated twist to the classic French manicure. This eye-catching design combines deep burgundy micro-glitter with a translucent pink base, creating depth that mimics the natural sheen of fresh raspberries.
According to celebrity nail artist Marina Chen, “The key to perfect raspberry glitter tips lies in the gradient application technique.” Start by applying a sheer pink base coat, then mix fine burgundy glitter with clear top coat for the perfect consistency. Using a small makeup sponge, dab the glitter mixture onto the nail tips, creating a subtle fade effect toward the center.
Professional nail technician Sarah Williams recommends specific products for superior results: “Use OPI’s ‘Berry Nice to Meet You’ glitter paired with Essie’s ‘Sugar Daddy’ as the base for an authentic raspberry shimmer.” The look can be customized by varying the glitter density and tip length, making it suitable for both formal events and casual wear. Seal the design with two layers of quick-dry top coat to keep the glitter firmly in place for up to two weeks.
Banana Split Art

“The key to nailing this design lies in the details,” explains master technician James Rodriguez, recommending OPI’s “Banana Bandana” and Essie’s “Sweet Cream” for authentic dessert hues.
Top the design with miniature sprinkle decals and a glossy top coat to seal your edible-inspired masterpiece. For added dimension, consider using 3D gel effects to make the “ice cream scoops” appear more realistic.
Pomegranate Seeds

For added dimension, incorporate tiny metallic accents using rose gold polish, placing them strategically between the red dots.
Top brands like OPI’s “Got the Blues for Red” and Essie’s “Forever Yummy” provide the perfect deep red shade for the seeds.
Seal your design with a high-gloss top coat, which not only protects the artwork but also enhances the seeds’ natural-looking sheen.
This sophisticated fruit-inspired design typically lasts 7-10 days with proper care.
Conclusion
Fruit-inspired nail art designs represent a vibrant fusion of creative expression and seasonal style. These playful manicures, from watermelon French tips to delicate citrus gradients, offer endless possibilities for self-expression while maintaining professional appeal. Professional nail artists confirm that proper technique and quality materials guarantee these designs last 7-10 days. With the right tools and attention to detail, these fruity designs transform basic manicures into miniature works of art that celebrate summer’s bounty.