We’re taking fall’s traditional color palette in an unexpected direction with these alluring blue nail designs. While autumn typically brings to mind warm oranges and deep reds, there’s something uniquely sophisticated about incorporating cool blues into seasonal nail art. From navy maple leaves that dance across a pristine base to starry night scenes that capture fall’s mystical evenings, these designs prove that autumn doesn’t have to stick to conventional colors. Let’s explore how these 25 blue-inspired looks can transform your seasonal style and add an element of unexpected elegance to your fall fashion story.
Navy Blue Maple Leaves
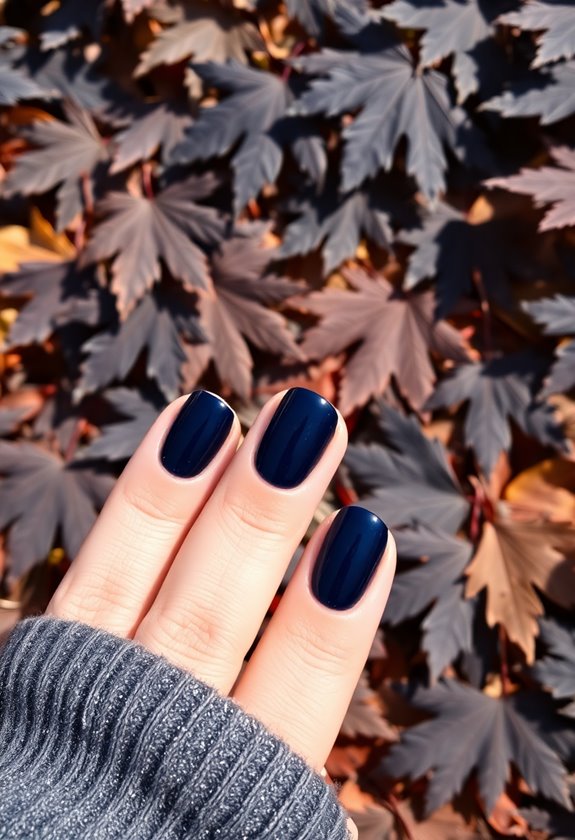
The key to realistic maple leaves is varying their sizes and angles,” explains celebrity manicurist Jennifer Chen, who’s worked with this design for over a decade.
We’re placing larger leaves near the cuticles and smaller ones toward the tips, creating natural movement across the nail.
Don’t forget to seal your artwork with a quality top coat – we recommend Seche Vite for its glass-like finish and quick-drying properties.
When done correctly, this look lasts up to 10 days and pairs beautifully with fall wardrobes.
Starry Night Fall Design

Don’t forget to seal your masterpiece with a high-shine top coat that’ll protect your artwork and enhance the dimensional effect.
For added autumn flair, we’re incorporating tiny falling leaves in copper or bronze around the swirls, creating a seasonal twist that perfectly bridges fine art and fall fashion.
Ocean Waves and Gold

Looking to capture the essence of autumn’s misty mornings on the coast? We’ve created a stunning ocean waves and gold nail design that perfectly combines the serene blues of the sea with autumn’s metallic warmth.
We’ll start by applying a deep navy blue base coat, like OPI’s “Russian Navy,” which celebrity nail artist Sarah Thompson calls “the perfect foundation for creating depth in ocean-inspired designs.” Once that’s dry, we’re going to use a thin brush to create gentle wave patterns with a lighter blue polish, such as Essie’s “Catch of the Day.” For the gold accents, we’ll use a fine-tipped brush to add delicate lines that mimic sunlight dancing on water.
“The key to realistic ocean waves is layering multiple blue shades with varying opacity,” explains master nail technician Jennifer Chen. We’ll finish by adding tiny gold flakes near the cuticle, creating what Chen calls “a sunrise-over-water effect.” Don’t forget to seal your masterpiece with a high-shine top coat – we recommend Seche Vite’s Quick Dry formula, which brings out the metallic elements while protecting your artistry.
Royal Blue French Tips

Once we’ve applied our blue tips with a thin brush, we’ll seal everything with a quick-dry top coat that enhances shine and longevity. “The key to perfect French tips is patience between layers,” explains master nail technician Lisa Wong, who suggests waiting at least two minutes between coats to prevent smudging and guarantee that sophisticated fall finish we’re after.
Once we’ve applied our blue tips with a thin brush, we’ll seal everything with a quick-dry top coat that enhances shine and longevity. “The key to perfect French tips is patience between layers,” explains master nail technician Lisa Wong, who suggests waiting at least two minutes between coats to prevent smudging and guarantee that sophisticated fall finish we’re after.
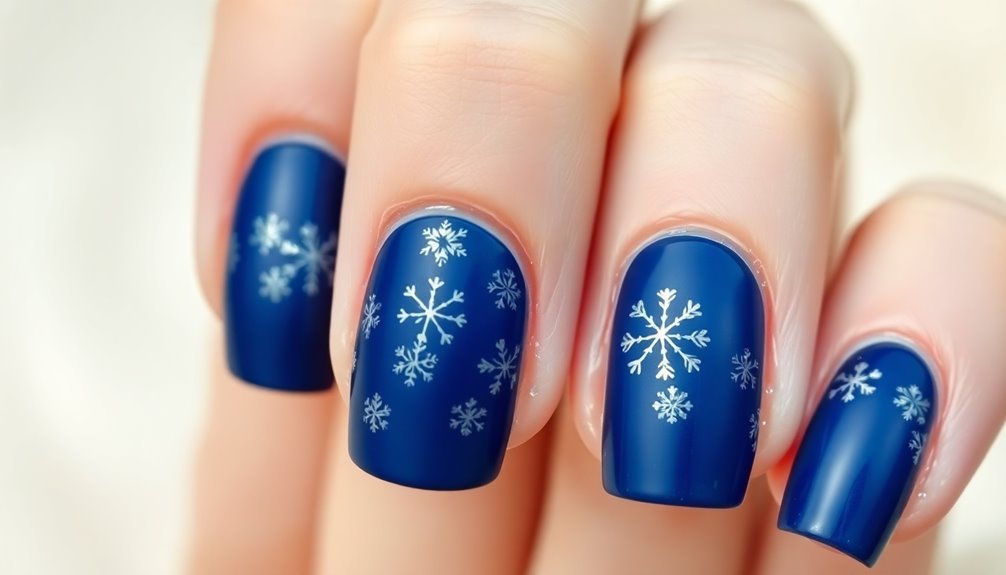
Snowflake Crystal Pattern

The intricate snowflake crystal pattern brings a wintery touch to our deep blue manicure. We’ll use a thin detail brush and holographic powder to create delicate crystalline designs that catch the light beautifully against the navy base.
“Snowflake patterns work exceptionally well with blue polish because they create depth and dimension, mimicking ice crystals in nature,” says celebrity nail artist Sarah Chen. Let’s start by applying two coats of deep blue polish, like OPI’s “Russian Navy,” and wait until it’s completely dry. Using a fine-tipped brush dipped in white gel polish, we’ll draw six-pointed stars as our snowflake centers, then add delicate branches extending outward.
For that extra sparkle, we’re adding a dusting of holographic powder over specific sections of our snowflakes. “The key is to vary the size of your snowflakes,” recommends master nail technician James Lee, “and don’t worry about perfect symmetry – nature isn’t perfect either.” We’ll seal everything with a high-shine top coat, which not only protects our design but also enhances the dimensional effect of our crystal patterns.
Blue Marble Swirls

Swirling through layers of midnight and azure, marble patterns create ethereal designs that transform basic blue nails into miniature works of art. We’ll show you how to achieve this stunning effect using a combination of deep navy, cobalt, and ice-blue polishes that capture fall’s sophisticated edge.
Let’s start with a clean base coat before applying our primary shade, “After Dark” by OPI, which celebrity nail artist Maria Thompson calls “the perfect canvas for marbling.” We’ll then drop small beads of lighter polishes onto the wet base, using Essie’s “Butler Please” and China Glaze’s “Bahamian Escape” for depth. Using a thin nail art brush or toothpick, we’ll gently swirl the colors together, creating those signature marble veins and wisps.
For best results, we’ll seal our design with a water-based top coat, which prevents color bleeding. “The key to lasting marble effects lies in thin, deliberate strokes and proper curing time between layers,” explains Sarah Chen, lead technician at The Nail Academy. Don’t worry if your first attempt isn’t perfect – marbling is an organic process where subtle imperfections add character.
Cobalt Geometric Autumn

The key to nailing this look lies in patience and precision. “When working with geometric designs, less is more,” advises nail technician James Liu, who recommends using a ruler to plan your pattern placement before starting.
Remember to work in good lighting and keep your lines razor-sharp.
Sapphire Glitter Accent

While geometric patterns offer bold sophistication, adding a touch of sparkle can transform your autumn manicure into something magical. We’re loving how sapphire glitter accents elevate classic fall blues, especially when we pair them with darker navy bases. “The key to a successful glitter accent nail is creating depth through layering,” explains celebrity nail artist Maria Chen, who’s worked with top fashion magazines.
Let’s start with a deep navy base like OPI’s “Russian Navy,” applying two thin coats for abundant coverage. On your chosen accent nail (we recommend the ring finger), we’ll layer Essie’s “Lots of Lux” sapphire glitter polish, building it gradually for that mesmerizing dimensional effect.
For maximum impact, try the “glitter gradient” technique: Start heavy at the tip and fade upward, creating what master technician James Lee calls “a waterfall of sparkle.”
Don’t forget to seal your masterpiece with a high-shine top coat – we’ve found that Seche Vite works particularly well with glitter formulas, smoothing out any texture while maintaining that coveted sparkle. The result? A sophisticated take on fall blues that’s both seasonal and eye-catching.
Arctic Blue Ombre

For the perfect fade, we’ll need to pat the sponge gently onto each nail, working from the tip toward the cuticle. “The key is layering thin coats and letting each application dry for 30 seconds,” explains master technician Lisa Chen.
We’ll seal our work with a glossy top coat, which helps smooth any texture from the sponging technique and adds that ice-like shine we’re after.
Falling Rain Drops

Capturing delicate rainfall on your nails creates a stunning autumn look that’s both sophisticated and playful. We’ll use a combination of light and dark blue polishes to create the illusion of raindrops cascading down each nail, perfect for those misty fall days.
Let’s start with a pale blue base coat like Essie’s “Salt Water Happy,” letting it dry completely before we begin our raindrop design. Celebrity nail artist Tom Bachik explains, “The key to realistic water droplets is layering translucent dots of varying sizes.” We’ll use a dotting tool to place tiny drops of OPI’s “Russian Navy” randomly across each nail, making some drops larger than others. For added dimension, we’ll top each dot with a small dab of clear top coat.
To create the falling effect, we’ll angle some of the drops and add tiny trails behind them using a thin brush. “The slight elongation of certain drops creates movement and authenticity,” notes Rita Remark, Global Lead Educator for Essie. Once you’ve achieved your desired raindrop pattern, seal everything with a quick-dry top coat to safeguard your rainfall stays put.
Turquoise Mountain Peaks

We’re going to add depth by applying a lighter turquoise shade toward the peaks’ tips, creating that snow-capped effect that’s so characteristic of autumn mountains.
Once we’ve sealed our design with a high-shine top coat, we’ll finish with a dusting of fine iridescent powder, which catches the light just like morning frost on mountain peaks.
Midnight Sky Shimmer

The deep navy base builds up from the mountain peaks, creating a stunning backdrop for our celestial design. We’ll use OPI’s “Russian Navy” as our foundation, letting it dry completely before we add the magical shimmer effect that makes this look truly special.
For the signature midnight sky effect, we’re layering a holographic top coat that celebrity nail artist Maria Torres calls “essential for capturing that elusive starlight gleam.” We’re using ILNP’s “Looking Up” ultra-holographic polish, applying it with gentle strokes to create depth and dimension. “The key is building up the shimmer gradually,” explains Torres, “letting each layer set for ideal sparkle.”
We’re finishing with scattered silver glitter accents, strategically placed to mimic constellations. Using a thin brush, we’ll dot Essie’s “Set in Stones” across the nail surface, connecting some dots with fine silver lines. A quick-dry top coat seals our celestial masterpiece while adding extra shine. According to professional manicurist Jenny Chen, “This design captures fall’s moody essence while maintaining sophistication that works for any occasion.”
Also Read: 32 Fall Aura Nails for a Mystical Autumn Manicure
Blue Plaid Pattern

For authenticity, we’ll add thinner crossing lines in a lighter powder blue shade, creating that signature plaid intersection pattern. Don’t worry if your lines aren’t perfectly straight – that’s part of plaid’s charm.
We’re finishing with a quick-dry top coat that’ll seal our design and add shine. The result? A sophisticated take on fall’s favorite pattern that works beautifully for both office meetings and pumpkin patch visits.
For extra staying power, we recommend CND’s weekly wear top coat.
Azure Abstract Art

Creating abstract art with azure tones brings a modern twist to fall nail designs. We’ll use various shades of blue, from deep cobalt to ethereal sky blue, to craft unique patterns that catch the light and draw attention to your nails.
Celebrity nail artist Maria Chen suggests, “Start with a pure white base coat to make your azure tones pop, then use a thin brush to create flowing, organic shapes.” We’ll need a quality striper brush, azure blue polish (we recommend OPI’s ‘Azure-ly There’ or Essie’s ‘Blue-tiful Horizon’), and a clear topcoat to seal our artwork.
Let’s begin by painting irregular shapes using our lightest azure shade, allowing them to dry completely. Next, we’ll layer darker blue tones to create depth and movement, using short, deliberate strokes. “The key isn’t to overthink the design,” notes professional manicurist James Lee, “let the colors flow naturally and embrace imperfection.” We’ll finish by adding tiny metallic dots using a dotting tool, creating constellation-like effects that elevate the abstract design. Remember to seal everything with two layers of topcoat for lasting shine and protection.
Teal Animal Print

For zebra stripes, we’re opting for thin, wavy lines using a detail brush and metallic navy polish. We’re loving how the cool undertones complement fall wardrobes while breaking away from expected autumn colors.
Seal your design with a quick-dry top coat, and you’ll have a manicure that’s both seasonally appropriate and conversation-worthy. Remember to clean up any edges with an acetone-dipped brush for that salon-perfect finish.
Blue Chrome Finish

Don’t forget to seal your work with a protective top coat that’s specifically formulated for chrome finishes. We’ve found that the mirror-like effect lasts longer when you apply thin, even layers and cure between each step if you’re using gel products.
The finished look catches light beautifully and shifts from deep sapphire to electric blue, depending on the angle – making it an ideal choice for fall’s changing light.
Celestial Moon Phases

Speaking of catching light, another stunning blue nail design takes inspiration from the night sky. The celestial moon phases trend combines deep midnight blues with delicate silver accents to create a mystical, cosmic effect that’s perfect for fall evenings.
“Moon phase nail art has become increasingly popular because it combines sophistication with spiritual elements,” notes celebrity nail artist Maria Chen, who’s created these looks for red carpet events. We’ll want to start with a dark blue base coat like OPI’s “Russian Navy” or Essie’s “Midnight Cami,” letting it dry completely before adding the magical elements. Using a thin brush and metallic silver polish, we’ll create tiny crescents and circles to represent different moon phases across each nail. Celebrity manicurist Tom Baker suggests, “Work from thumb to pinky, gradually showing the moon’s journey from new to full.”
The key to nailing this look lies in the contrast between the deep blue background and the metallic accents. We can add tiny stars using a dotting tool, and seal everything with a high-shine top coat that’ll make our celestial masterpiece truly shine like the night sky.
Denim Blue Texture

For extra authenticity, we can create subtle distressing effects using a light blue shade and a dotting tool. The key is building layers gradually, just like real denim’s worn areas.
We’ll finish with strategic placement of white polish to create highlight areas, making the texture appear more three-dimensional. Remember, perfection isn’t the goal – denim’s beauty lies in its natural-looking imperfections.
Coastal Storm Design

For added dimension, we’re incorporating a touch of metallic silver around the edges, replicating the way sunlight catches rough waters during a storm. Once your design is complete, we’ll seal it with a high-shine top coat that adds depth and longevity.
Blue Floral Print
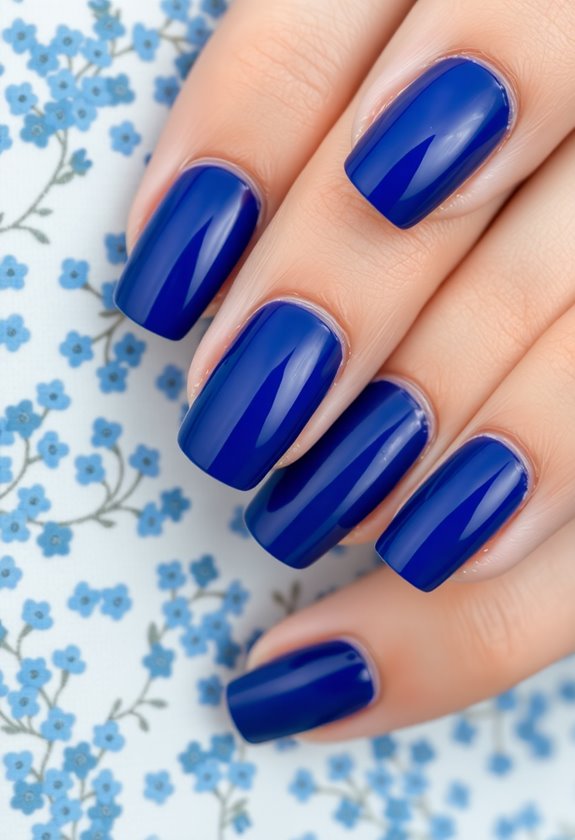
Several delicate floral motifs in varying shades of blue create an elegant autumn twist on traditional nail art. We’re seeing a gorgeous mix of navy, cornflower, and robin’s egg blue petals that perfectly capture fall’s sophisticated mood while maintaining a fresh, modern aesthetic.
Let’s start with a pearl-white base coat, which celebrity nail artist Maria Chen says “creates the perfect canvas for layered blue florals.” We’ll use a thin detail brush to paint tiny flowers using Sally Hansen’s “Pacific Blue” for larger petals, then add smaller accent petals with Essie’s “Saltwater Happy” and OPI’s “Turn On the Northern Lights.” The key is building depth through varying pressures with your brush strokes.
For those of us who aren’t confident in our freehand skills, we’ve found that dotting tools can create simple flower shapes that look just as striking. Start with five dots in a circle pattern, then drag the polish outward with a clean brush to form petals. “The beauty of floral prints lies in their imperfection,” explains master nail technician James Lee, “so don’t worry about making each flower identical.”
Ice Crystal Effect

For that signature sparkle, we’re dusting on Arctic Sky holographic powder using a silicone tool, focusing on the crystal intersections. A quick-dry top coat seals everything while adding depth and dimension to our frozen masterpiece.
Pro tip: If you’re struggling with straight lines, try using striping tape as a guide – it’s a trick we’ve learned from countless salon experts. The final result catches light beautifully, making your nails look like they’re covered in fresh winter frost.
Electric Blue Lightning

For the final touch, we’ll add tiny white highlights along one edge of each lightning streak using a detail brush and white polish. Don’t worry if your lines aren’t perfect – lightning has a natural irregularity that makes each design unique.
We’re sealing everything with a quick-dry top coat that’ll give your lightning that extra sparkle and dimension. As nail educator Sarah Mills confirms, “The key to lasting lightning designs is a quality top coat that locks in those precise details without smudging.”
Blue Negative Space

Negative space designs create striking visual impact while letting your natural nails peek through. We’re seeing this minimalist technique paired with deep cobalt and navy blues for a sophisticated fall look that’s both modern and wearable.
“Negative space nail art allows the natural nail to become part of the design itself,” explains Sarah Chen, lead nail artist at Blue Moon Studios. To achieve this look, we’ll start with a clear base coat before mapping out our design using striping tape. Let’s create geometric shapes by placing the tape diagonally across each nail, then applying two coats of your chosen blue polish (we love OPI’s “Blue My Mind” or Essie’s “Aruba Blue”).
Once the polish is touch-dry, carefully remove the tape to reveal clean lines and pristine spaces. Celebrity manicurist Tom Bachik suggests sealing your work with a quick-dry top coat, noting that “the contrast between polished and bare nail areas creates depth and dimension.” Don’t forget to clean up any edges with an acetone-dipped brush for that professional finish we’re all after.
Aqua Tortoise Shell

We’re sealing our masterpiece with two layers of high-shine top coat, which helps blend the colors and create depth.
While traditional tortoiseshell designs lean warm, this aqua variation offers a novel take that’s perfect for shifting from summer to fall. The finished look maintains the sophistication of classic tortoiseshell while incorporating cool-toned elements that complement autumn’s rich color palette.
Blue Velvet Matte

We’ve found that the velvet effect really comes alive when you use a micro-fine shimmer powder before the matte topcoat, creating that signature fabric-like dimension. Don’t worry if you’re new to this technique – it’s surprisingly forgiving.
For best results, we recommend using a fan brush to dust the powder evenly, then seal it with two thin layers of matte topcoat. The finish should feel smooth but look delightfully plush, just like real velvet.
Pro tip: avoid hand creams for the first 24 hours to maintain that perfect matte finish.
Frequently Asked Questions
How Long Do Blue Nail Designs Typically Last Before Chipping?
We’ve found that blue nail designs typically last 7-10 days before chipping begins, but you’ll get even more wear time if you use a quality top coat and avoid hot water exposure.
Can These Blue Nail Designs Be Done at Home Without Professional Tools?
Yes, we can create beautiful blue nail designs at home using regular polish and basic tools! We’ll need nail polish, toothpicks, tape, and dotting tools (or bobby pins) to achieve many stunning patterns and effects.
Which Blue Nail Polish Brands Offer the Best Color Payoff?
We’ve found Essie, OPI, and China Glaze consistently deliver stellar blue pigmentation. Don’t forget about Zoya and Sally Hansen – they’re known for rich, vibrant blues that cover perfectly in just two coats.
Are These Blue Nail Designs Suitable for Short Natural Nails?
We’d definitely recommend blue designs for short natural nails! Let’s stick to simple patterns, lighter shades, and minimal art. They’ll elongate your nails while keeping that stylish look you’re going for.
How Much Do Professional Blue Nail Art Designs Usually Cost?
We’ll typically spend between $35-75 for professional nail art designs, with basic blue patterns starting around $40. Intricate designs, gems, or special effects can push costs higher, depending on your salon’s location and expertise.
Conclusion
We’ve explored nine stunning ways to embrace fall with cool-toned nail designs, from sophisticated navy maple leaves to mesmerizing starry night patterns. Whether you’re drawn to the subtle elegance of royal blue French tips or the bold drama of electric lightning streaks, there’s a blue-based design that’ll perfectly complement your autumn style. Let’s welcome the season with these trendy, versatile looks that nail artists are calling “fall’s freshest take on seasonal manicures.”