Brown nail designs offer a stunning palette of sophistication, elegance, and warmth. Whether you prefer subtle nude tones, rich chocolate shades, or trendy designs that incorporate metallic accents, brown nails are versatile and timeless. They effortlessly complement any outfit or occasion, from casual brunches to glamorous evening events.
This collection of 37 gorgeous brown nail designs will inspire your next manicure. From minimalist looks to intricate patterns, there’s something for everyone to fall in love with. You’ll find ideas that highlight the earthy charm of brown while staying chic and modern. Ready to elevate your nail game? Let’s explore these breathtaking designs that prove brown is anything but boring!
Classic Brown French Tips

For the cleanest lines, we recommend using French tip guide stickers, positioning them just below where you want the brown line to start. Apply two thin coats of your chosen brown shade, letting each layer dry completely.
Don’t forget to seal your work with a high-shine top coat – we love Seche Vite’s Quick Dry formula. The result? A sophisticated twist on French tips that’ll complement any outfit or occasion.
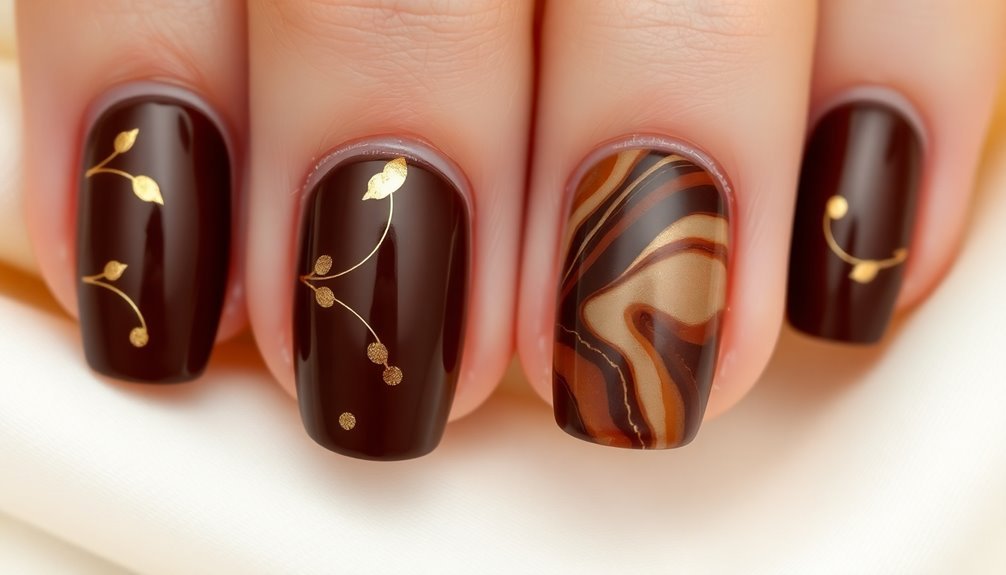
Chocolate Marble Swirls

While French tips offer timeless elegance, marble swirls bring artistic flair to brown nail designs. We’re seeing more nail artists create these mesmerizing patterns that mimic the luxurious look of chocolate marble, and they’re surprisingly achievable at home with the right technique.
To create chocolate marble swirls, we’ll need a medium brown base color (we recommend OPI’s “Chocolate Moose” or Essie’s “Little Brown Dress”), a lighter brown shade, and a white polish for contrast. “The key to perfect marble swirls is working quickly while the polish is wet,” explains celebrity nail artist Maria Thompson, who’s created looks for fashion magazines worldwide.
Start by applying your base color, then drop small dots of your additional colors while the base is still tacky. Using a thin nail art brush or toothpick, we’ll gently swirl the colors together, creating those signature marble patterns. Pro tip: don’t overwork the swirls – less is more. According to nail educator Sarah Chen, “Three to four gentle swipes are usually enough to achieve that natural marble effect.” Finish with a high-shine top coat to seal your masterpiece.
Coffee Bean Art

For best results, we recommend using a top-quality clear topcoat like Seche Vite to seal your design and add shine. Don’t forget to clean up around the edges with acetone for that professional finish.
This look works beautifully on all nail lengths, but we find it’s particularly striking on medium-length oval or almond shapes, where the beans have room to really make a statement.
Golden Brown Glitter Accent

Don’t forget to seal your masterpiece with a high-shine top coat – we’re loving Seche Vite’s quick-dry formula for this look. The combination of matte brown and sparkling gold particles creates a sophisticated contrast that’s perfect for both office wear and special occasions.
For extra longevity, wrap the tips of your nails with each layer, ensuring your glitter accent stays brilliant for up to two weeks.
Earthy Geometric Patterns

Moving from glitter to geometry, earthy brown patterns bring architectural precision to your nail art game. We’re seeing nail artists combine warm chocolate browns, taupes, and mochas with clean lines and striking angles to create sophisticated geometric designs that catch everyone’s eye.
To recreate these earthy patterns at home, we’ll need striping tape, a steady hand, and at least two complementary brown shades. “The key to perfect geometric patterns is letting each layer dry completely,” says celebrity nail artist Maria Chen, who recommends OPI’s Chocolate Moose and Essie’s Light as Linen for the best contrast. Start with a neutral base coat, apply your striping tape in your desired pattern, and carefully paint your chosen browns between the lines.
We’re particularly fond of chevron patterns using matte and glossy finishes, which nail tech Sarah Rodriguez calls “the perfect blend of natural and modern aesthetics.” Don’t forget to seal your design with a top coat that won’t smudge your lines – we’ve found Seche Vite works brilliantly for maintaining those crisp edges while providing lasting shine.
Mocha Ombre Fade

Why not embrace the gradual shift from light to dark brown tones with a sophisticated mocha ombre? We’ve seen this stunning technique trending in salons everywhere, and it’s surprisingly achievable at home with the right tools and approach.
Let’s start with a neutral base using OPI’s “Over the Taupe” as our lightest shade, which celebrity nail artist Maria Thompson calls “the perfect starting point for any mocha ombre.” We’ll need three coordinating brown polishes, ranging from latte to espresso tones, plus a makeup sponge to create that flawless fade.
Start by painting your lightest shade as the base, then dab your three chosen colors side by side on the makeup sponge. Using gentle, rolling motions, we’ll press the sponge onto each nail, creating that seamless progression between shades. “The key to perfect ombre is overlapping the colors slightly while they’re still wet,” explains master nail technician James Chen.
After two layers of sponging, seal your artwork with a high-shine top coat – we recommend Seche Vite for its glass-like finish and quick-drying formula. Remember to clean up any excess polish around your cuticles with a small brush dipped in acetone.
Brown Sugar Sparkles

While mocha ombre creates elegant depth, adding sparkle to brown nails brings a whole new dimension of glamour. When we’re looking to elevate our chocolate-toned manicures, brown sugar sparkles offer that perfect balance of sophistication and fun, combining warm earth tones with light-catching shimmer.
To achieve this look, we’ll start with a rich brown base coat like OPI’s “Chocolate Moose” or Essie’s “Little Brown Dress.” Celebrity nail artist Maria Thompson suggests, “Apply two thin coats of your brown base, then dust fine copper or bronze glitter over the final layer while it’s still tacky.” We’ve found that mixing different sizes of glitter particles creates the most authentic brown sugar effect.
For best results, we’ll seal our sparkly creation with two layers of clear top coat, ensuring those glitters stay firmly in place. According to nail technician Sarah Chen, “The key to long-lasting sparkle designs is proper encapsulation – think of it like preserving crystals in glass.” This style works beautifully for both long and short nails, and it’s especially striking when paired with neutral-toned outfits or autumn wardrobes.
Animal Print Brown

Looking to liberate your wild side with a sophisticated twist? Animal print brown nail designs offer the perfect balance of untamed beauty and refined elegance that we’ve come to love in modern nail art.
We’re seeing nail technicians embrace everything from leopard spots to tiger stripes in rich chocolate and caramel tones. “Brown animal prints are incredibly versatile because they work with both casual and formal looks,” says celebrity nail artist Maria Chen. To create this look at home, start with a neutral beige base coat, then use a thin brush to paint irregular spots or stripes with different shades of brown. We recommend OPI’s “Chocolate Moose” and Essie’s “Little Brown Dress” for the perfect contrast.
For beginners, nail stencils can help achieve precise patterns, while more experienced artists might try freehand techniques with a dotting tool. Don’t forget to seal your masterpiece with a high-gloss top coat – we love Seche Vite’s quick-dry formula. The best part? These designs typically last 7-10 days without chipping, making them perfect for those who want their manicure to make a lasting impression.
Autumn Leaves Design

Autumn’s signature shades come alive in fall-inspired brown nail designs that capture the season’s natural beauty. We’re seeing nail artists create stunning maple leaf patterns using rich chocolate browns, warm chestnuts, and subtle copper accents that perfectly mimic nature’s seasonal palette.
To achieve this look, we’ll start with a neutral beige base coat, like OPI’s “Coconut Over OPI,” which serves as our canvas. Next, we’ll use a thin detail brush to paint delicate leaf outlines using a darker brown shade, such as Essie’s “Mink Muffs.” Celebrity nail artist Sarah Thompson notes, “The key to realistic autumn leaves is layering different brown tones and adding tiny veining details.” We’ll dot some metallic bronze highlights using CND’s “Bronze Chrome” to create that subtle shimmer that real leaves possess.
For added dimension, we can incorporate some negative space techniques, letting parts of the natural nail peek through like dappled sunlight through fall foliage. Don’t forget to seal your masterpiece with a high-quality top coat – we recommend Seche Vite’s quick-dry formula to preserve those intricate leaf details while adding gorgeous shine.
Caramel Drip Effect

Through the artful application of glossy caramel tones, the drip effect creates an eye-catching illusion of sweet syrup cascading down each nail. We’ll use different shades of brown gel polish, starting with a warm base color like OPI’s “Chocolate Moose” or Essie’s “Hot Coco,” to achieve this mouth-watering look.
Celebrity nail artist Maria Thompson explains, “The key to a realistic drip effect lies in the viscosity of your polish and precise timing.” We’ll start by applying our base color, then use a dotting tool to place small beads of slightly darker polish near the cuticle. With a thin brush, we’ll gently pull these beads downward, creating natural-looking drips that vary in length and width. Pro tip: mix a bit of gold shimmer into your darker brown shade for dimension.
For best results, we recommend working on one nail at a time and curing between layers. “Temperature control is essential,” notes master technician James Chen, “keep your polish at room temperature for optimal flow.” Don’t forget to seal your design with a high-gloss top coat to enhance that delicious, wet-look finish.
Bronze Metallic Shine

Don’t forget to seal your metallic masterpiece with a high-shine top coat that’s specifically formulated for metallic polishes. We’ve found that Seche Vite’s Quick Dry Top Coat works particularly well with bronze finishes, preventing that dreaded dulling effect that can happen over time.
For extra drama, try adding a matte top coat to select nails, creating an unexpected contrast that makes the metallic portions pop even more.
Brown Plaid Pattern

Creating a plaid pattern in brown tones brings classic fall vibes to your nail design. We’ve found that combining chocolate brown, tan, and warm caramel shades creates the most authentic tartan look, while thin stripes of gold or copper can add subtle dimension to the pattern.
“The key to a successful plaid design lies in the precision of your striper brush strokes,” says Sally Hansen’s lead nail artist Maria Chen. We’ll start with a neutral beige base coat, letting it dry completely before using a thin brush to create intersecting lines.
For the primary pattern, we’re using OPI’s “Over the Taupe” as our base, followed by “Chocolate Moose” for the darker crosshatching. A detail brush dipped in “San Tan-tonio” works perfectly for the thinner accent lines.
To prevent smudging between layers, we’ll apply a quick-dry topcoat after each color set. Remember to seal your edges with the topcoat to prevent chipping, as plaid patterns require multiple layers. The final result should look structured yet organic, just like your favorite flannel shirt.
Professional nail artist James Wong recommends using striping tape for perfectly straight lines if you’re new to plaid designs.
Tortoiseshell Nails

For a more dimensional look, we can add a few darker spots with a deep chocolate shade, but let’s remember less is more – we’re aiming for elegant tortoiseshell, not cluttered chaos.
Once we’ve achieved our desired pattern, we’ll seal it with a high-shine top coat to enhance that glossy, tortoiseshell finish that’s turning heads this season.
Rustic Wood Grain

To achieve this look, we’ll start with a warm brown base coat like OPI’s “Chocolate Moose” or Essie’s “Mink Muffs.” Once that’s dry, we’ll use a thin striper brush dipped in a lighter shade, such as CND’s “Bare Chemise,” to create long, wavy lines mimicking wood grain patterns. The key is keeping your strokes irregular and organic, just as you’d see in natural wood.
For added dimension, we’ll use a darker brown like Zoya’s “Louise” to create subtle knots and variations. Professional nail tech Sarah Wong notes, “The secret to realistic wood grain is building up thin layers gradually and varying the pressure of your brush strokes.”
A glossy top coat seals the design and adds that perfect finishing touch that makes your nails look like polished hardwood.
Brown Negative Space

Minimalist brown negative space designs offer a sophisticated twist on traditional nail art. By strategically leaving portions of the natural nail exposed, we’re creating an elegant interplay between painted and bare sections that’s both modern and refined.
Celebrity nail artist Maria Thompson notes, “Negative space designs in warm brown tones are incredibly versatile, working beautifully for both office wear and special occasions.” We’ll want to start with a clear base coat, then use striping tape to section off geometric shapes where we’ll leave the natural nail showing. Popular patterns include diagonal splits, crescents, and abstract triangles.
For the perfect brown shade, we recommend OPI’s “Chocolate Moose” or Essie’s “Light as Linen” for a softer taupe effect. “The key is using thin, precise lines to create clean boundaries between the polish and negative space,” explains nail technician James Chen, who’s worked with top fashion magazines. When applying the polish, we’ll need two thin coats for desirable coverage while keeping the edges crisp. Finally, we’ll seal everything with a high-shine top coat, being careful not to flood the negative space sections.
Abstract Brown Lines

Abstract brown line designs take our negative space concept to the next level with fluid, organic strokes that dance across the nail bed. We’re seeing nail artists create stunning compositions using thin brushes and shades like chocolate, caramel, and warm mahogany to craft everything from minimalist curves to intricate geometric patterns.
Celebrity nail artist Maria Rodriguez explains, “The key to perfect abstract lines is using a detail brush with synthetic bristles and keeping your hand steady.” We recommend starting with a clear base coat, then using Deborah Lippmann’s ‘Terra Nova Brown’ or OPI’s ‘Chocolate Mocha’ for your lines. Let’s keep the design asymmetrical and spontaneous – there’s no need for perfect symmetry here.
To achieve the look, we’ll use a thin striping brush dipped in polish, making sure it’s not too loaded. Draw your lines with confident, continuous strokes, varying the pressure to create different widths. Remember what top nail educator Sarah Chen always says: “Abstract lines should flow naturally, like branches in the wind.” Seal your masterpiece with a quick-dry top coat to prevent smudging.
Brown Floral Details

Delicacy meets design in brown floral nail art, where earthy tones create sophisticated botanical elements. We’re seeing a surge in nail artists using varying shades of brown, from rich chocolate to soft taupe, to craft intricate flower patterns that catch everyone’s eye. “Brown florals offer a modern take on traditional botanical designs, especially when layered with metallic accents,” says celebrity nail artist Maria Chen.
Let’s break down how to achieve these stunning designs at home. We’ll start with a neutral base coat, preferably OPI’s “Over the Taupe,” then use a fine-tipped nail brush to paint delicate petals in darker browns like Essie’s “Little Brown Dress.” For added dimension, we’re incorporating small dots at the flower centers using a dotting tool and metallic bronze polish. “The key to perfect floral details lies in pressure control,” notes nail technician James Rodriguez, “start light and build up the color gradually.”
Don’t forget to seal your masterpiece with a high-quality top coat, which will protect those detailed florals while adding that professional shine we’re all after.
Taupe Gradient Blend

For best results, we’ll seal our gradient with a gel-effect top coat, which helps blend the colors seamlessly while adding lasting shine.
Don’t forget to clean up any excess polish around the cuticles with an angled brush dipped in acetone. This look typically lasts 7-10 days when properly sealed and maintained with cuticle oil.
Also Read: 26 Green Christmas Nails for a Festive Holiday Look
Espresso Matte Finish

Deep, velvety browns stand out beautifully when topped with a matte finish, making this espresso-inspired design a sophisticated choice for any season. We’ll need a rich brown polish like OPI’s “Espresso Your Inner Self” or Essie’s “Little Brown Dress” as our base, plus a high-quality matte top coat to achieve this look.
Let’s start by applying a ridge-filling base coat, which celebrity nail artist Tom Bachik says “creates the perfect canvas for matte finishes.” After it dries, we’re going to apply two thin coats of our espresso-colored polish, waiting two minutes between each layer.
Once the color is completely dry (about 10-15 minutes), we’ll add the matte top coat using steady, even strokes.
Here’s a pro tip from master manicurist Julie Kandalec: “When working with matte finishes, avoid touching the nails for at least 20 minutes after application, as oils from your skin can create unwanted shine spots.” To maintain this velvet-like finish, we’ll want to reapply the matte top coat every 4-5 days, keeping hand cream away from the nail surface.
Brown Crystal Embellishments

When selecting crystals, we’re loving Swarovski’s new Earth-tone collection, particularly their ‘Mocha Dream’ and ‘Caramel Sunset’ options. To create depth, we’ll mix different sizes – using larger stones (SS12) as focal points and smaller ones (SS5) for detail work.
Remember to seal everything with a quality top coat, but don’t cover the crystals themselves – they’ll shine brighter when left exposed.
Brown Tribal Patterns

For beginners, we recommend starting with simple repeating patterns on accent nails, then gradually working up to more complex designs. Don’t forget to seal your artwork with a quality top coat – Seche Vite works wonders for preserving intricate tribal details.
And if you’re feeling unsure, nail stamps with tribal motifs can help achieve professional-looking results while maintaining authenticity in your patterns.
Cappuccino Swirls

For extra dimension, we recommend adding a metallic accent using Essie’s “Penny Talk” to create subtle highlights.
Finish with a high-gloss top coat to seal your masterpiece and enhance the multi-tonal brown depths.
Brown Heart Accents

Adding delicate heart accents to your brown manicure creates a charming, romantic twist on classic earth tones. We’re seeing more nail artists incorporate these sweet details using shades like OPI’s “Chocolate Mocha” as a base, while adding miniature hearts in complementary hues like “Over the Taupe” or metallic rose gold.
To create these lovely accents, we’ll start with two coats of your chosen brown shade, letting each layer dry completely. “The key to perfect heart designs lies in using a fine-tip nail art brush and maintaining steady pressure,” explains celebrity nail artist Maria Chen. We recommend dotting two small circles close together, then dragging them down to form a point – it’s easier than freehand drawing.
For added sophistication, try placing single hearts on ring fingers as accent nails, or scatter tiny hearts across all nails for a more playful approach. A clear top coat like Seche Vite will seal your design and add lasting shine. According to master nail technician James Liu, “Brown heart accents work particularly well during fall and winter months, though they’re becoming increasingly popular year-round for their versatile charm.”
Minimalist Brown Dots

Simple dots in varying shades of brown create an elegant minimalist statement that’s both modern and refined. We’re seeing nail artists combine earthy tones like espresso, caramel, and chocolate brown to craft delicate dotted patterns that catch the eye without overwhelming the nail design.
To achieve this look at home, we’ll need a few essential tools: a dotting tool set (we recommend the AIMEILI Professional Dotting Kit), a light brown base coat, and two to three complementary brown shades. “The key to minimalist dot designs is precision and spacing,” says celebrity nail artist Maria Chen. “Start with a neutral base, then create dots in varying sizes while maintaining consistent spacing.”
Let’s begin by applying our base coat in a soft taupe or beige brown. Once it’s completely dry, we’ll create our dots using the smallest dotting tool first. Work from light to dark browns, spacing dots asymmetrically for a modern feel. “Always let each layer of dots dry completely before adding the next shade,” advises Chen. Finish with a clear top coat to seal your artistry.
Brown Snake Print

Slithering onto the nail art scene, brown snake print designs capture the exotic patterns found in nature while maintaining a sophisticated, wearable aesthetic. We’re seeing this versatile pattern everywhere, from subtle nude-brown scales to rich chocolate serpentine swirls that make a statement without being overly bold.
To create this look at home, we’ll start with a neutral brown base coat, like OPI’s “Chocolate Moose” or Essie’s “Mink Muffs.” Once that’s dry, we’ll use a thin nail art brush to create irregular, connecting curves with a darker brown shade, such as Sally Hansen’s “Brown Out.” Celebrity nail artist Tom Bachik suggests, “The key to realistic snake print is varying the spacing and size of your scales, keeping them organic and imperfect.”
We’re loving how this design works especially well on longer nails, where the pattern has room to develop, but it’s equally striking on shorter lengths. For added dimension, we’ll dot white polish between some scales, and seal everything with a high-shine top coat. As nail tech Maria Thompson notes, “Brown snake print is quickly becoming the new neutral – it’s sophisticated enough for the office but interesting enough for evening wear.”
Cinnamon Chevron Design
After carefully peeling away the tape while the polish is still slightly wet, we’ll seal our design with a quick-dry topcoat. “The key to crisp chevron lines,” says Chen, “lies in the timing of tape removal and steady hand movement.”
We’re loving how this design combines the earthy warmth of brown with sharp, modern angles, making it perfect for both office wear and special occasions.
Nutmeg Glitter Tips

Take your brown nail design up a notch with shimmering nutmeg-toned glitter tips. This sophisticated twist on the classic French manicure combines warm brown tones with fine glitter particles, creating an elegant yet modern look that’s perfect for any season. “The key is selecting a glitter polish with a nutmeg or cinnamon undertone that complements your base color,” says celebrity nail artist Maria Chen, who’s worked with numerous red-carpet clients.
We’ll start with a neutral brown base coat, like OPI’s “Chocolate Moose” or Essie’s “Mochacino.” Once that’s dry, we’ll create the glitter tips using a thin striping brush and a fine-particle glitter polish in warm brown tones. Pro tip: Sally Hansen’s “Bronze Ablaze” works beautifully for this effect. Apply the glitter in a gentle curve across the tip, making sure it’s not too thick or overwhelming.
For extra staying power and shine, we’ll seal everything with a high-quality top coat. “The secret to perfect glitter tips lies in the precision of your application line,” notes Chen, recommending nail tape for beginners who want crisp, clean edges.
Brown Butterfly Wings

The artistic butterfly wing design brings an ethereal touch to brown nail art, moving beyond glitter for a more nature-inspired approach. We’ll create delicate wing patterns using different shades of brown, from rich chocolate to light taupe, that’ll make your nails truly stand out.
Start with a neutral beige base coat, which nail artist Maria Chen calls “the perfect canvas for butterfly detailing.” Once it’s dry, we’ll use a thin brush to draw curved wing lines with dark brown polish, creating that signature monarch butterfly pattern. For added dimension, we’re mixing in some metallic copper accents – celebrity manicurist Sarah Johnson recommends OPI’s “Bronze Me Pretty” for this step.
The key to nailing this look lies in the symmetry and precision of our wing patterns. We’ll use dotting tools to add tiny brown spots along the wings’ edges, and you can incorporate some white highlights to make the design pop. Don’t forget to seal everything with a high-quality top coat – we love Seche Vite’s quick-dry formula, which preserves the intricate details while adding shine that’ll make your butterfly wings appear almost three-dimensional.
Walnut Crosshatch Pattern

Inspired by walnut wood grain, crosshatch patterns create a sophisticated, textured look on brown nails. We’ll start with a rich walnut-brown base coat like OPI’s “Chocolate Moose” or Essie’s “Hot Coco,” letting it dry completely before moving on to the detailed work.
To achieve the crosshatch effect, we’re using a thin striping brush to draw intersecting diagonal lines. “The key to realistic wood grain is varying the pressure and spacing of your lines,” explains nail artist Sarah Chen, who’s created looks for multiple fashion weeks. We’ll use a slightly lighter brown shade, like CND’s “Maple Sugar,” for the overlapping lines to create depth and dimension.
For the best results, we’re working in small sections, drawing our first set of parallel lines at a 45-degree angle, then crossing them with another set going the opposite direction. Don’t worry if they’re not perfectly straight – natural wood grain isn’t either! We’ll finish with a matte top coat, as celebrity manicurist Tom Bachik notes, “A matte finish enhances the wood-like appearance and makes the crosshatch pattern pop more naturally.”
Brown Lace Effect

For those who aren’t comfortable with stamping, there’s another approach we love: using brown polish as the base and applying white nail art polish with a thin brush to hand-paint delicate swirls and dots. “The beauty of lace designs is their forgiving nature – slight imperfections add to their charm,” explains nail technician Sarah Chen.
We’ll finish with a high-shine top coat, making sure to cap the free edge to prevent chipping and extend wear time.
Cocoa Powder Speckles

Let’s start with a medium brown base coat, like OPI’s “Chocolate Moose” or Essie’s “Mink Muffs.” Once that’s dry, we’ll create our speckles using a detail brush dipped in darker shades like “Hot Cocoa-ture” and “Coffee Break.” Hold the brush about six inches above your nail and gently tap it to create random specks, just as master nail technician James Roberts suggests: “The distance between brush and nail determines speckle size – closer for bigger dots, further for finer ones.” We’ll finish with a quick-dry topcoat to seal in our work, making sure those tiny speckles stay perfectly in place for up to two weeks.
Brown Paisley Design

Creating elegant paisley patterns starts with a light brown base like Essie’s “Bare With Me” or OPI’s “Over the Taupe.” Once dry, we’ll use a thin detail brush and darker brown shades to draw curved teardrop shapes across each nail, connecting them with delicate swirls and flourishes.
Celebrity nail artist Maria Thompson explains, “The key to perfect paisley is varying your pressure on the brush – lighter for thin lines, firmer for fuller shapes.” We’ll work with three brown shades: our base color, a medium chocolate brown like China Glaze’s “Mahogany Magic,” and a deep espresso shade for depth and dimension.
Start at the cuticle area, drawing one main teardrop shape that curves toward the nail tip. We’ll add smaller teardrops and swirls branching off the main design, using our darkest shade to create shadow effects. “Always seal your paisley design with two layers of top coat,” recommends Thompson, “as the raised elements need extra protection.” Don’t worry if your first attempts aren’t perfect – paisley’s organic nature means slight imperfections add character to the design.
Earth Tone Stripes

Brown striped designs offer a simpler yet equally striking alternative to intricate paisley patterns. We’ve found that earth-tone stripes create a stunning visual effect when you combine various shades like chocolate, caramel, and mocha in alternating lines.
To achieve this look, we’ll start with a neutral base coat, preferably OPI’s “Over the Taupe” or Essie’s “Mochacino.” According to celebrity nail artist Maria Thompson, “The key to perfect stripes is using thin nail tape and allowing each layer to dry completely.” We recommend applying the lightest shade first, then carefully placing striping tape diagonally across each nail before applying darker colors.
For the most sophisticated look, we’re loving combinations of three to four earth tones, such as taupe, cappuccino, espresso, and a touch of metallic bronze. Professional nail technician James Chen suggests, “Keep your lines consistent in width and spacing for the most polished appearance.” Don’t forget to seal your design with a high-quality top coat – we’ve found that Seche Vite works exceptionally well for preventing smudging and extending wear time.
Brown Crocodile Texture

For added dimension, we’re loving the combination of matte and glossy finishes. Apply a matte topcoat to the base, then seal the crackle pattern with a high-shine finish – this contrast really makes the texture pop.
Remember to seal the edges of your nails to prevent chipping, and don’t forget a good cuticle oil to keep the surrounding skin hydrated. This look typically lasts 7-10 days with proper maintenance.
Desert Sand Swirls

Tranquility meets artistry in these mesmerizing desert sand swirls that capture nature’s fluid patterns. We’re obsessed with how this design mimics the windswept dunes of the Sahara, creating an ethereal look that’s both sophisticated and earthy.
To achieve these dreamy swirls, we’ll start with a warm brown base coat, like OPI’s “Chocolate Moose,” letting it dry completely. Celebrity nail artist Maria Thompson suggests, “The key to perfect sand swirls is working with at least three complementary brown shades, from lightest to darkest.” We’ll use a thin brush to create flowing curves with “Essie’s Sand Tropez” and “Sally Hansen’s Toasted Almond,” allowing each layer to set before adding the next.
The magic happens when we use a dotting tool to add tiny specks of metallic gold polish, creating that signature sparkle of sun-kissed sand. Remember to seal your masterpiece with a high-quality top coat – we recommend Seche Vite’s quick-dry formula. For extra dimension, try adding a matte topcoat to certain sections, creating contrast between glossy and velvet-like finishes that truly capture desert textures.
Amber Crystal Accents

We recommend using genuine crystal elements rather than plastic alternatives, as they’ll reflect light more brilliantly and last longer.
For the perfect finish, seal everything with a high-quality top coat, being careful not to disturb the crystal placement. The result is a sophisticated look that’s both wearable and eye-catching, perfect for special occasions or when we’re craving something more elevated than traditional brown nail art.
Brown Velvet Finish

Creating a velvet finish on brown nails has become one of the most sought-after techniques in modern nail art. We’ve found that achieving this luxurious, velvety texture requires specific products and careful application techniques that transform ordinary polish into something extraordinary.
Let’s start with the essentials: you’ll need a brown base coat, velvet powder in your chosen shade of brown, and a top coat specifically designed for textured finishes. “The key to a perfect velvet finish lies in the magnetic particles within the powder,” explains Sarah Chen, lead technician at LA Nail Academy. We recommend applying your base color first, then while it’s still tacky, gently dust the velvet powder over the surface using a soft brush.
For best results, we’ve found that working in small sections helps maintain control over the powder distribution. After applying the powder, use a clean brush to remove excess product, then seal with your specialized top coat. Celebrity nail artist James Wong notes, “The final top coat application should be light and even to preserve the velvet texture while ensuring longevity.” The result is a sophisticated, touchable finish that catches light beautifully.
Frequently Asked Questions
How Long Do Brown Nail Designs Typically Last Before Chipping?
We can expect brown nail designs to last 7-14 days with proper nail prep and a quality top coat. At-home manicures typically chip sooner, while professional gel or acrylic designs can last up to 3 weeks.
Can Brown Nail Designs Be Done at Home Without Professional Tools?
Yes, we can create brown nail designs at home using regular nail polish and simple tools. Let’s start with basic items like toothpicks, tape, or dotting tools. We’ll achieve great results with patience and practice.
Which Skin Tones Work Best With Brown Nail Designs?
We love how brown nail designs complement all skin tones beautifully. Deep chocolates pop on fair skin, while caramel and nude browns enhance darker complexions. It’s a versatile shade that works universally across the spectrum.
Are Brown Nail Designs Appropriate for Formal Events and Weddings?
We definitely think brown nail designs work beautifully for formal events and weddings. They’re sophisticated, elegant, and complement formal wear perfectly. Just opt for glossy finishes and classic shades for these special occasions.
What Base Coat Works Best for Preventing Brown Polish From Staining Nails?
We recommend using a ridge-filling base coat like OPI Natural Nail or Essie First Base before applying brown polish. These formulas create a strong protective barrier and they’re our go-to choices for preventing stains.
Conclusion
We’ve explored an array of stunning brown nail designs that prove this versatile shade deserves a prime spot in your manicure rotation. From classic French tips with a modern twist to luxurious velvet finishes, there’s a brown-based look for every style preference and skill level. Whether you’re drawn to subtle earth tones or glamorous metallic accents, these designs offer endless possibilities to elevate your nail
while staying perfectly on-trend.