
The timeless allure of tortoise shell patterns has seamlessly migrated from vintage accessories to contemporary nail art, offering a sophisticated twist on traditional manicure designs. This versatile aesthetic combines warm amber tones, rich browns, and subtle black accents to create depth and dimension that complements any outfit or occasion. From subtle accent nails to bold full-coverage designs, the possibilities for interpreting this classic pattern are remarkably diverse. As we explore these 31 engaging variations, you’ll discover how this enduring trend continues to evolve while maintaining its inherent elegance.
Classic Tortoise Shell Manicure

Celebrity manicurist Tom Bachik suggests, “The final glossy topcoat is essential – it melds the colors together and creates that signature glass-like finish.” For best results, use quality products like OPI’s “Brown Sugar” and “Melt In Your Mouth” for the base colors.
This versatile design works particularly well on longer nails, where the pattern has room to develop, though it can be adapted for shorter lengths with a more concentrated pattern.
Golden Hour Tortoise Tips

For best results, seal the design with a high-shine top coat that enhances the multidimensional effect. This variation works particularly well on longer nail shapes, where the pattern has room to develop naturally.
According to salon owner Jessica Mitchell, “Golden Hour Tortoise Tips have become increasingly popular among clients seeking a sophisticated twist on traditional tortoise shell designs, especially during summer months.”
Minimalist Shell Accent Nails

With a delicate touch, minimalist tortoise shell accent nails offer an understated approach to this classic pattern. Rather than covering every nail in the distinctive brown and amber swirls, this style strategically places tortoise shell details on one or two accent nails while keeping the remaining nails neutral.
Celebrity nail artist Tom Bachik explains, “The key to minimalist tortoise shell accents is selecting just one or two fingers per hand, typically the ring finger or middle finger, to showcase the pattern.” To achieve this look, start with a neutral base coat on all nails, then create the tortoise effect using a combination of brown, amber, and black gel polishes on your chosen accent nails. Renowned technician Julie Kandalec recommends using thin, deliberate brush strokes to create organic shapes that mimic natural tortoise patterns.
This approach works particularly well with OPI’s “My Solar Clock is Ticking” as a base shade, paired with CND Shellac’s “Dark Dahlia” and “Fine Vermillion” for the tortoise details. The result is a sophisticated, work-appropriate manicure that maintains visual interest without overwhelming the overall look.
Dark Chocolate Shell Design

The final step involves adding small, sporadic dots of black gel polish to mimic the natural depth found in authentic tortoise shell. Apply a high-shine top coat to seal the design and create that coveted glossy finish.
According to Nails Magazine’s technical director, Sarah Martinez, “The dark chocolate version of tortoise shell nails has become increasingly popular among professionals who want an understated yet eye-catching manicure that shifts effortlessly from office to evening events.”
Amber Swirl Pattern

Master nail technician James Chen explains, “The beauty of amber tortoise shell lies in its imperfect nature – each swirl should be unique and organic.” Complete the design by spotting darker brown accents sparingly throughout the pattern, then seal with a high-gloss topcoat.
This versatile design works particularly well on longer nails, where the pattern has room to develop, though it can be adapted for shorter lengths with careful scaling of the swirl elements.
Matte Tortoise Effect

“The secret to a perfect matte tortoise effect lies in the timing,” notes professional manicurist Sarah Chen, who recommends waiting exactly two minutes between layers. “When applying the matte topcoat, use thin, even strokes to prevent streaking and guarantee uniform coverage.”
This technique works particularly well for fall and winter seasons, when subtle, sophisticated nail art tends to dominate fashion trends.
Geometric Shell Art

For the most precise results, use a detail brush to paint within the taped sections, allowing each layer to dry completely before adding the next.
Top brands like OPI’s “Trading Paint” and Essie’s “Playing Koi” work beautifully for creating the warm, translucent tones essential to this design.
Finish with a high-shine top coat to seal the geometric elements and enhance the dimensional effect of your modern tortoise shell creation.
Mixed Length Shell Nails

Combining varied nail lengths with tortoise shell patterns creates a striking modernization of this classic design. Professional nail artist Maria Chen notes, “Mixed lengths add dimension to tortoise shell patterns, making them appear more dynamic and three-dimensional.” This contemporary approach allows for creative expression while maintaining the sophistication of traditional tortoise shell designs.
To achieve this look, start by applying different length extensions to alternate fingers, typically keeping the thumb, middle, and pinky fingers shorter. Celebrity manicurist Sarah Thompson recommends using gel extensions for durability, stating, “The varied lengths need extra reinforcement to prevent breakage.” Apply a warm brown base coat, then layer amber and dark brown gel polishes using a thin brush to create irregular, organic shapes. A clear topcoat with golden shimmer adds depth to the pattern.
Popular combinations include alternating lengths between 1.5 and 2.5 centimeters, with the tortoise pattern varying in scale accordingly. For best results, use quality products like CND Shellac in Burnt Romance for the base and Aprés Gel X extensions for length variation. This style typically lasts 2-3 weeks with proper maintenance.
Negative Space Shell Details

The negative space technique works particularly well on longer nails, where the contrast between bare and painted areas creates visual interest. For best results, concentrate the tortoise shell pattern on either the tips or bases of nails, allowing natural nail to peek through strategically placed gaps.
This modern interpretation of the classic tortoise shell design offers a fresh, architectural approach that’s both sophisticated and contemporary.
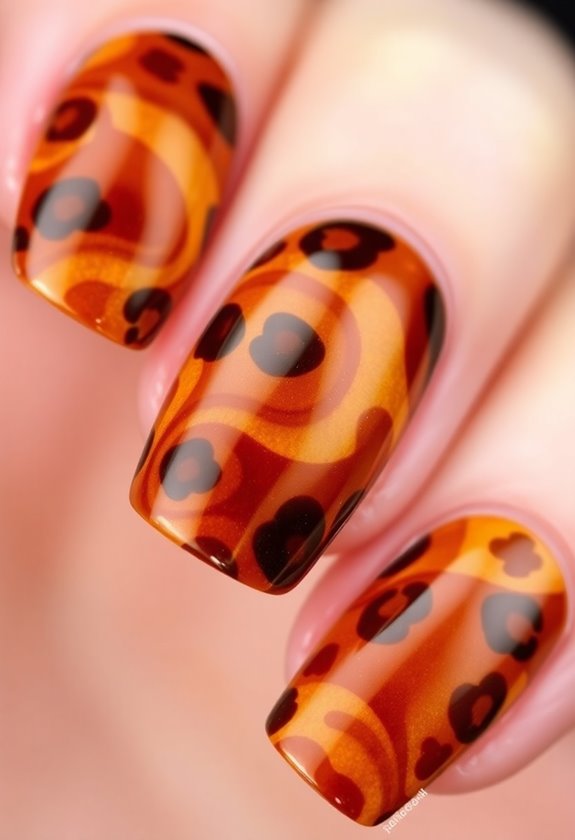
Caramel Splash Design

The final step involves adding darker brown accents sparingly with a toothpick or dotting tool, creating depth and dimension. Seal the design with a high-shine top coat to enhance the molten caramel effect.
This wearable interpretation of tortoise shell perfectly balances sophistication with organic beauty, making it suitable for both professional settings and special occasions.
Chrome Tortoise Shell

The key to mastering chrome tortoise shell lies in product selection and technique. Use high-quality chrome powders like the MODELONES Chrome Collection or OPI Chrome Effects for ideal results.
Create depth by strategically placing darker elements toward the cuticle area, while concentrating lighter chrome accents toward the center of each nail. The final result should showcase a sophisticated blend of metallic browns, golds, and copper tones that shift and shimmer with movement, making this variation particularly suitable for special occasions or when you want your manicure to make a statement.
French Shell Tips

With a modern twist on classic French manicures, tortoise shell French tips offer an elegant and sophisticated nail design option. This versatile look combines the timeless appeal of French tips with the rich, dimensional patterns of tortoise shell, creating a uniquely refined aesthetic that works for both casual and formal occasions.
Celebrity nail artist Maria Thompson notes, “French shell tips are particularly striking when created using a combination of amber, chocolate, and honey-toned polishes.” To achieve this look, start with a neutral base coat, then apply thin, precise French tips using a light brown polish. Using a detail brush, add irregular spots and patches in darker brown and black shades, allowing them to slightly overlap. A clear top coat with golden shimmer can add depth and dimension to the final result.
The key to successful tortoise shell French tips lies in the layering technique, according to professional manicurist James Chen: “Build the pattern gradually, starting with lighter colors and working toward darker shades, ensuring each layer dries completely before adding the next.” This technique creates authentic-looking patterns that capture the sophisticated essence of natural tortoise shell.
Also Read: 22 Refreshing White Summer Nail Ideas for a Clean Look
Tortoise Shell Stilettos

For maximum impact, incorporate gold flakes or metallic accents between layers to add luxurious dimension.
Seal the design with a high-gloss top coat that enhances the tortoiseshell’s natural sheen.
While challenging to maintain due to their length, these statement nails are perfect for special occasions and can last up to three weeks with proper care and maintenance.
Natural Shell Ombre

Simplicity meets sophistication in the natural shell ombre design, which seamlessly shifts from light beige to rich amber tones. This understated yet elegant approach captures the essence of genuine tortoiseshell patterns while maintaining a professional appearance suitable for any occasion.
Celebrity nail artist Maria Thompson notes, “The key to achieving the perfect natural shell ombre lies in the gradual blending of neutral polishes, starting with a creamy base and building up to deeper tortoise-inspired hues.” To create this look, begin with a neutral base coat, then use a fine brush to gradually layer OPI’s “Bare My Soul” and Essie’s “Playing Koi” in a subtle gradient pattern.
The technique requires patience and precision, as each layer should be thin and well-blended. According to master technician Sarah Chen, “The most common mistake is rushing the metamorphosis between shades.” Allow each layer to dry completely before adding the next, and seal with a high-shine top coat to enhance the natural depth. This versatile design pairs particularly well with both casual and formal attire, making it an excellent choice for clients seeking understated elegance.
Marble Shell Blend

The final result should showcase seamless shifts between colors, with gentle swirls that catch the light differently from every angle. This modern interpretation works particularly well on longer nails, where the pattern has more space to develop naturally.
For best results, seal the design with a high-shine top coat that enhances the marble’s glossy, multi-dimensional appearance.
Glitter Shell Accents

Looking to add extra sparkle to your tortoise shell manicure? Incorporating glitter accents into tortoise shell nail designs creates a stunning combination that celebrity nail artist Maria Thompson calls “sophistication meets glamour.” By strategically placing fine glitter particles within the traditional brown and amber patterns, you can elevate this classic look to new heights.
To achieve this effect, start with a neutral base coat before applying your standard tortoise shell design. Once the pattern is complete, celebrity manicurist Jesse Carter recommends using a fine-tipped brush to add drops of gold or copper glitter polish to specific areas, particularly where the darker browns meet. “Focus the sparkle on just 20-30% of the pattern to maintain elegance,” notes Carter. Popular choices include OPI’s “Gold Digger” or Essie’s “Summit of Style” for their ultra-fine particles.
For best results, seal your glitter placement with two layers of top coat, allowing each layer to dry completely. This technique not only adds dimension to your tortoise shell design but also creates what Vogue nail expert Sarah Chen describes as “a sophisticated play of light that catches the eye without overwhelming the classic pattern.”
Abstract Shell Pattern

For added dimension, incorporate unexpected color combinations like deep navy, forest green, or even burgundy into the traditional brown palette. Apply a layer of clear topcoat between color applications to prevent bleeding, and seal with a high-shine finish.
Professional nail educator James Martinez notes, “The key to successful abstract tortoise shell is embracing imperfection – each nail should be unique but cohesive within the overall design.” This modern take works particularly well on longer nail shapes, where the abstract pattern has more space to develop.
Honey-Toned Shell Design

The final step involves sealing the design with a high-gloss top coat, which not only protects the artwork but enhances the dimensional quality of the pattern. For best results, apply thin layers and allow each to dry completely before adding subsequent coats.
This contemporary take on tortoise shell maintains its upscale appeal while offering a more subtle, versatile option for both professional and casual settings.
Tortoise Shell Coffin Nails

For added dimension, incorporate gold flakes or a glossy top coat to create depth and movement.
The finished result works exceptionally well with 2-3 accent nails per hand, while keeping the remaining nails in complementary neutral tones.
This versatile design pairs beautifully with both casual and formal attire, making it a practical yet striking choice for any occasion.
Crystal Shell Effect

Creating crystal shell effects elevates traditional tortoise shell designs by incorporating iridescent elements and translucent overlays. This modern interpretation adds depth and dimension through strategic layering of clear gel polishes and shimmering pigments, creating a multifaceted appearance that catches light beautifully.
“The key to achieving the perfect crystal shell effect lies in building transparent layers gradually,” explains celebrity nail artist Maria Chen. Start with a clear base coat, then apply scattered dots of brown and amber gel polishes. Using a detail brush, create irregular patterns with black gel polish, being careful to leave spaces for translucent areas. Between each layer, cure under LED light for maximum clarity and depth.
To enhance the crystalline appearance, many professionals recommend using Aurora pigment powder or holographic flakes sparingly over specific areas. “The final step involves applying a thick layer of high-shine top coat,” notes Chen, “which creates that glass-like finish essential for the crystal effect.” This technique works particularly well on longer nail shapes, where the extended surface area allows the multidimensional patterns to truly showcase their complexity and shine.
Modern Shell Shapes

For those seeking a more dramatic statement, the ballerina shape offers an extended surface area that accommodates larger tortoise shell motifs. To achieve these modern shapes, professionals recommend using professional-grade files like the Crystal Nail File Pro Series, working in one direction to prevent splitting.
The key is maintaining proportion while ensuring the shape enhances, rather than overshadows, the tortoise shell pattern’s natural beauty.
High-Gloss Shell Pattern

A high-gloss finish elevates tortoise shell nail designs from understated to luxurious. According to celebrity nail artist Maria Thompson, “The secret to achieving that glass-like shine lies in the layering technique and your choice of top coat.” The reflective surface creates depth within the tortoise pattern, making the amber and chocolate hues appear more dimensional and sophisticated.
To achieve this high-shine effect, start with a clear base coat before applying your tortoise shell design. Celebrity manicurist James Chen recommends using “a combination of warm brown, honey, and black gel polishes, carefully dotted and swirled together while still wet.” The key is to work quickly, allowing the colors to blend naturally without fully mixing.
Once your pattern is set, apply two thin layers of a high-gloss top coat, waiting two minutes between each application. For ideal results, professional nail technicians suggest using products like Seche Vite Quick Dry Top Coat or CND Vinylux Long Wear Top Coat, which are known for their mirror-like finish and lasting power. Remember to cure each layer under an LED lamp if using gel products to maximize shine and durability.
Metallic Shell Highlights

Popular metallic polishes for this technique include OPI’s “Worth a Pretty Penny” and Essie’s “Good as Gold,” which provide the perfect shimmer without overwhelming the base pattern. Apply these highlights sparingly, focusing on areas where light naturally hits the nail.
For best results, seal your design with a high-quality top coat that enhances the metallic elements while protecting the intricate pattern beneath, such as Seche Vite’s Quick Dry formula.
Textured Shell Design

For the finishing touch, alternate between glossy and matte topcoats in specific areas to enhance the textural contrast. Apply a matte finish to certain sections while leaving others glossy, creating what master nail technician Sarah Wu describes as “a multi-dimensional masterpiece that looks incredibly realistic under any lighting.”
This technique works particularly well with longer nail shapes, where the texture has more space to develop naturally.
Also Read: 24 Fun Summer Nail Designs for Every Occasion
Tortoise Shell Almond Nails

Showcasing elegance and sophistication, tortoise shell designs on almond-shaped nails have become a sought-after choice among nail enthusiasts and professionals alike. The elongated almond shape creates an ideal canvas for the intricate patterns and warm tones characteristic of tortoise shell designs.
According to celebrity nail artist Maria Thompson, “The key to achieving the perfect tortoise shell effect on almond nails lies in layering translucent amber, chocolate, and black polishes.” Start with a neutral base coat, then create irregular spots using dark brown polish, followed by smaller black accents. Professional nail technicians often use a thin brush to add golden-honey highlights, creating depth and dimension.
The combination of almond shaping and tortoise shell patterns works particularly well with longer nail lengths, as noted by the International Nail Technicians Association. For excellent results, use high-quality gel polishes like CND Shellac in Burnt Romance or OPI’s Nature Strong collection, which provide the necessary transparency for authentic-looking patterns. A glossy top coat seals the design while enhancing the tortoise shell’s characteristic shine, making this style perfect for both formal occasions and everyday wear.
Animal Print Fusion

Popular combinations include tortoise shell with snake print edges, leopard spot highlights, or zebra stripe accent nails. Professional nail technician Sarah Chen recommends OPI’s “Dark Brown” and “Black Onyx” for the tortoise elements, paired with Maniology’s animal print stamping plates for precise pattern placement.
The key to successful fusion lies in maintaining consistent color schemes and ensuring proper scale between different patterns.
Bronzed Shell Pattern

The final step involves sealing your design with a high-shine top coat that contains subtle golden reflects. Many professionals prefer Essie’s “Good as Gold” top coat for its lasting power and light-catching properties.
For extra durability, nail technician Sarah Wong suggests “capping the free edge of each nail to prevent premature chipping and maintain that luxurious bronzed finish for up to two weeks.”
Dimensional Shell Art

Moving beyond basic bronzed patterns, dimensional shell art elevates tortoise shell nails to a new level of sophistication. This advanced technique incorporates multiple layers of gel polish and strategic placement of clear overlays to create a truly three-dimensional effect that catches light beautifully.
Celebrity nail artist Marie Thompson explains, “The key to achieving depth in tortoise shell art lies in building translucent layers with varying opacity levels.” To create this look, start with a neutral base coat, then apply spots of dark brown and amber gel polishes in irregular patterns. Between each layer, cure under an LED lamp and add a thin clear coat to create the best dimension.
Professional nail technician Sarah Chen recommends using ORLY’s “Penny Leather” and “Coffee Break” shades, topped with their “Glass Half Full” clear overlay for ideal dimension.
The final result should feature distinct layers that appear to float within the nail design, much like real tortoise shell’s natural variations. For added drama, some artists incorporate subtle gold leaf fragments between layers, though this should be done sparingly to maintain the authentic tortoise shell appearance.
Shell Gradient Tips

For best results, use high-quality gel polishes like OPI’s Nature Strong in “Raisin the Bar” for dark spots and Essie’s “Clothing Optional” for lighter elements.
Between each layer, cure under an LED lamp for 30 seconds to build dimension. Finish with a glossy top coat to seal the design and enhance the tortoise shell’s characteristic shine, creating a sophisticated gradient that flows seamlessly into your natural nail.
Spotted Shell Design
For best results, use polishes with varying levels of opacity. Professional brands like OPI’s “Brown Sugar” and Essie’s “Playing Koi” work particularly well for this technique.
Remember to seal your design with a high-quality gel top coat – this not only extends wear time but also enhances the glossy, three-dimensional effect that makes tortoiseshell patterns so enchanting.
Floating Shell Elements

Skilled nail artists frequently incorporate floating tortoiseshell elements to create depth and visual interest in their designs. Rather than covering the entire nail, these artisans strategically place translucent tortoise patterns that appear to float over a neutral base color, creating an sophisticated, three-dimensional effect. “The key to achieving realistic floating elements is layering different shades of amber and brown with varying opacity levels,” explains celebrity nail artist Maria Chen.
The technique requires careful attention to detail and precise application methods. Start with a sheer nude base coat, then use a small detail brush to create irregular spots in warm brown shades. Layer these with dots of darker brown and black, allowing some areas to remain more transparent than others. Celebrity manicurist Tom Bachik suggests, “Use a clear top coat between layers to achieve that authentic floating appearance.” Popular color combinations include honey amber with chocolate brown accents, or caramel tones with deep mahogany spots. This versatile design works particularly well on longer nails, where the floating elements have more space to create visual impact, though shorter nails can carry modified versions of the look.
Conclusion
Tortoise shell nail designs represent an enduring trend that seamlessly blends sophistication with artistic expression. From classic amber swirls to modern geometric interpretations, these versatile patterns offer endless customization possibilities for nail enthusiasts. The combination of rich earth tones, dimensional effects, and varied application techniques guarantees this timeless aesthetic remains relevant across seasons and styles. With proper technique and quality products, achieving professional-looking tortoise shell manicures becomes an accessible art form for any skill level.