Let’s explore how green Christmas nails can transform our holiday style this season. We’ve curated 26 stunning designs that range from subtle and sophisticated to bold and playful, ensuring there’s something for every taste and skill level. From the timeless appeal of evergreen French tips to the modern edge of geometric patterns, these festive options offer more than just seasonal charm – they’re conversation starters that perfectly complement our winter wardrobes. Whether we’re hosting family gatherings or attending office parties, these nail designs will help us showcase our holiday spirit with elegance and flair. Now, let’s discover how each style can make our celebrations even more memorable.
Classic Evergreen French Tips

Let’s start with a clean base coat, followed by two thin layers of a sheer pink polish like OPI’s “Bubble Bath.” Once that’s dry, we’ll use striping tape to create our guide lines for those perfect tips.
For the green, we’re reaching for Essie’s “Off Tropic” or OPI’s “Stay Off the Lawn,” which nail professionals consistently rank as top choices for evergreen manicures. Using a thin brush, we’ll carefully paint the tips, keeping the line crisp and even. “The key is patience with the tape removal,” explains master technician Sarah Wong, “wait until the polish is completely dry to prevent bleeding.”
We’ll finish with a high-shine top coat to seal our work and add that gorgeous holiday gleam that’ll last through all your festivities.
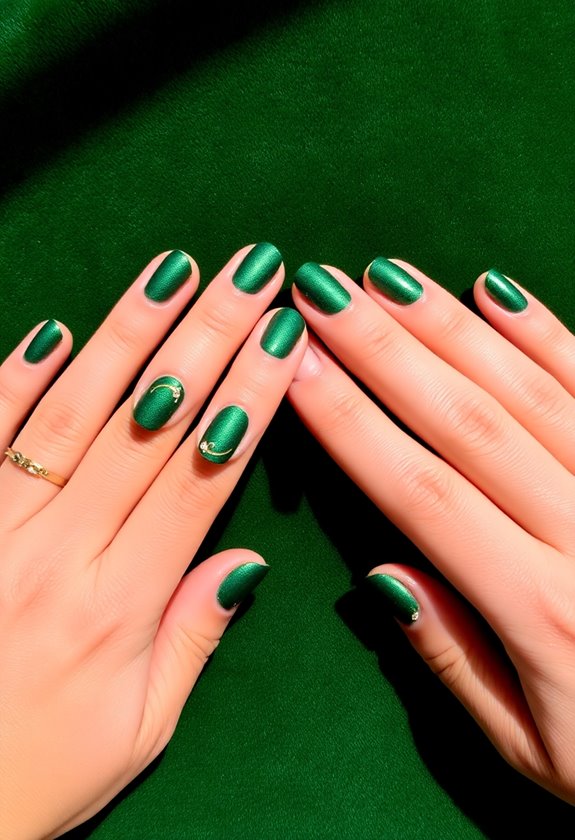
Glittering Emerald Swirls

While classic French tips bring timeless elegance, swirling patterns offer a mesmerizing twist on holiday nail art. Let’s create stunning emerald swirls that’ll capture everyone’s attention at your next holiday gathering.
We’ll start with a deep forest green base coat – we recommend OPI’s “Christmas Gone Plaid” or Essie’s “Off Tropic.” Once that’s dry, we’ll use a thin striper brush dipped in metallic emerald polish to create flowing, organic swirls. “The key to perfect swirls is maintaining consistent pressure while moving the brush in fluid motions,” says celebrity nail artist Maria Chen.
For that extra festive touch, we’ll dust fine holographic glitter over still-wet swirls using a fan brush. Professional nail technician James Liu suggests, “Apply a quick-dry top coat before the glitter to make it stick precisely where you want it.” Don’t forget to seal everything with two layers of clear top coat – this helps the design last through all your holiday celebrations.
For best results, work in good lighting and take your time with each swirl. Remember, they don’t need to match perfectly; slight variations make the design more interesting and natural-looking.
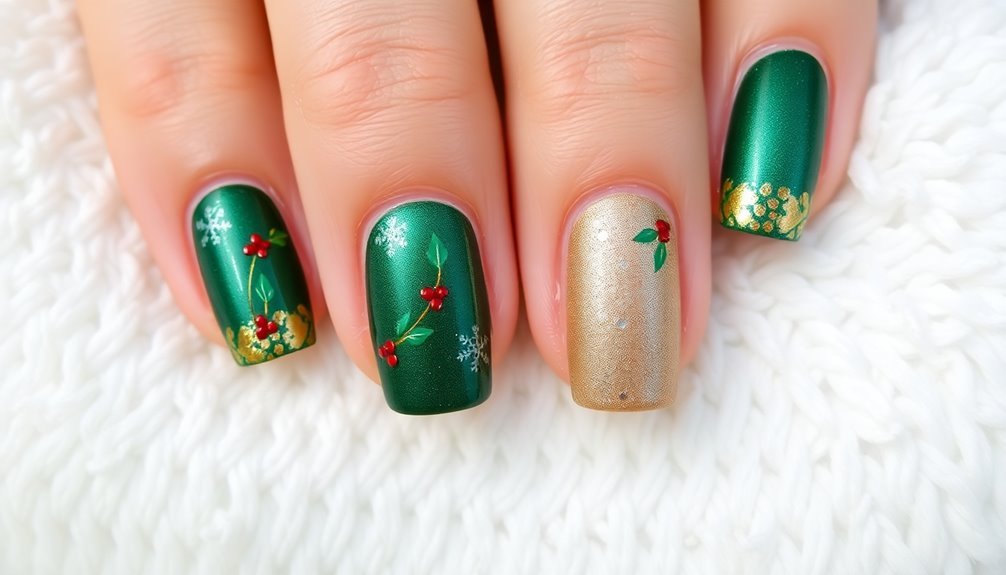
Holly Berry Accents

For added dimension, we’re going to dot a tiny amount of white polish in the center of each berry, creating a realistic light reflection.
Mistletoe Magic

For the signature white mistletoe berries, we’ll dot them in groups of three using a dotting tool and pure white polish. Don’t forget to seal your design with a high-gloss top coat that’ll protect your artwork and add dimension. We’ve found that Seche Vite’s quick-dry top coat works best, as it won’t smear the detailed work we’ve created.
Remember to let each layer dry completely before moving on to the next step.
Forest Green Geometric
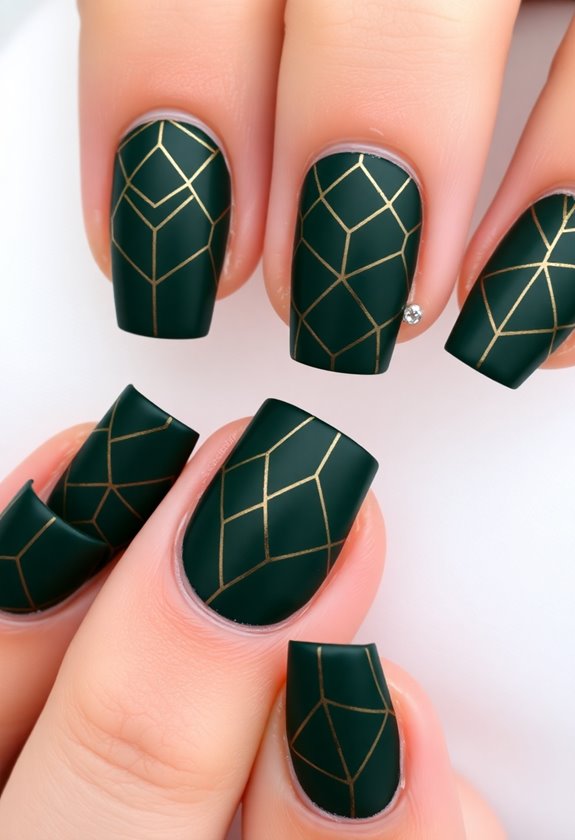
Geometric patterns bring a modern twist to traditional holiday nail art. When we combine deep forest green with angular shapes, we’re creating a sophisticated holiday look that’s both festive and contemporary.
Let’s start with a base of Essie’s “Off Tropic” or OPI’s “Stay Off the Lawn,” which celebrity nail artist Sarah Thompson calls “the perfect evergreen bases for geometric designs.” We’ll need striping tape, a detail brush, and a steady hand to create precise lines and shapes. First, apply two coats of the base color, letting each layer dry completely.
Once the base is set, we’re going to place striping tape in triangular patterns across each nail, pressing firmly to prevent bleeding. “The key to crisp geometric designs is patience with your tape placement,” notes master nail technician Lisa Chen, who’s worked on numerous fashion week runway shows. We’ll paint over the exposed areas with metallic gold or silver polish, then carefully remove the tape while the polish is still slightly wet. Seal your design with a quick-dry topcoat like Seche Vite, which won’t smear your intricate pattern.
Mint Candy Stripes

Light and playful, mint candy stripes offer a whimsical take on holiday nail art that captures the sweetness of the season. We’ll create this festive look using a soft mint green base coat, like Essie’s “Mint Candy Apple,” paired with thin white stripes that remind us of peppermint candies and sugar-coated holiday treats.
To achieve this design, we’ll start by applying two coats of our mint base color, letting each layer dry completely. “The key to perfect candy stripes is patience with the base coat,” says celebrity nail artist Sarah Chen, “because any tackiness will affect the crisp lines we’re aiming for.”
Next, we’ll use striping tape or a thin brush with white polish, like OPI’s “Alpine Snow,” to create diagonal lines across each nail. For the most professional finish, we’ll space our stripes about 2mm apart, working from left to right. Once we’ve completed the stripes, we’ll seal our design with a quick-dry top coat, which nail technician Mark Rogers confirms “prevents color bleeding and extends wear time to 7-10 days.”
Pine Tree Silhouettes

For added dimension, we’re mixing a touch of gold glitter into some trees, while others can remain solid green. We’ll finish by sealing our forest scene with a glossy top coat that’ll make these trees shimmer like they’re covered in fresh snow.
The best part? This design works beautifully as an accent nail or across all fingers, depending on how much forest you’d like to showcase.
Sage and Gold

“The key to this combination is balance,” explains Sarah Johnson, lead educator at The Nail Academy. “Keep the gold elements minimal to maintain sophistication.” We recommend adding gold only to accent nails or as fine details on each finger.
To seal your masterpiece, we’ll use a quick-dry top coat that prevents chipping and enhances the metallic shine. This combination typically lasts 7-10 days with proper application and maintenance, making it perfect for all your holiday festivities.
Metallic Green Ombre

Dreaming of a more dramatic holiday look? Let’s explore the stunning metallic green ombre technique that’s taking holiday nail art by storm.
To create this eye-catching gradient effect, we’ll start with a dark emerald base coat, like OPI’s “Christmas Gone Plaid,” and gradually shift to a lighter metallic shade, such as Essie’s “For the Twill of It.” Celebrity nail artist Maria Thompson notes, “The key to perfect ombre is working quickly while the polish is wet and using a makeup sponge to dab the colors together.” We’ll need three complementary metallic green shades, a makeup sponge, and clear top coat to achieve this look.
Start by applying your darkest shade to the entire nail, then paint three stripes of your chosen greens (dark to light) onto the makeup sponge. Gently dab the sponge onto each nail, moving slightly up or down with each tap to create the gradient. “The metallic finish adds dimension that regular creams can’t match,” explains Thompson. Once you’ve achieved your desired fade, seal it with a high-shine top coat. The result? A sophisticated, sparkling holiday manicure that’ll have everyone green with envy.
Christmas Wreath Design

To complete our wreath, we’ll add tiny red dots using a precision brush for berries, and finish with a delicate gold bow at the bottom using Zoya’s “Ziv.” Don’t forget to seal your design with a quality top coat – we recommend Seche Vite for long-lasting wear.
The design works best as an accent nail paired with solid green companions.
Green Plaid Pattern

Finally, we’ll seal everything with a quick-dry top coat that’ll give your plaid design that glossy, professional finish. This versatile pattern works beautifully as an accent nail or across all fingers for a more dramatic holiday statement.
Finally, we’ll seal everything with a quick-dry top coat that’ll give your plaid design that glossy, professional finish.
This versatile pattern works beautifully as an accent nail or across all fingers for a more dramatic holiday statement.
Sparkly Snow Flakes

Another stunning holiday nail design pairs perfectly with our plaid pattern – sparkling snowflakes. We’ll create delicate, shimmering designs that catch the light and add an elegant winter touch to your green Christmas manicure.
To achieve this look, we’ll start with a base of emerald green polish, letting it dry completely. “The key to perfect snowflakes is working with a fully set base coat,” explains celebrity nail artist Sarah Chen. Next, we’ll use a thin detail brush and white nail polish mixed with a touch of silver glitter. We’ve found that Essie’s “Set in Stones” works beautifully for this effect.
For the snowflake design, we’ll make six small lines radiating from a center point, then add smaller branches to create that classic crystalline pattern. Don’t worry if they’re not identical – natural snowflakes never are! Once the white design is dry, we’ll seal everything with a high-shine top coat that contains light-reflecting particles. Try OPI’s “Shine Bright” top coat, which master technician James Lee calls “essential for that realistic ice crystal effect.”
Green Marble Effect

Marble magic transforms ordinary green polish into a mesmerizing swirled masterpiece. We’ll create this sophisticated look using emerald and forest green polishes, along with white and gold accents that’ll make your nails truly stand out this holiday season.
Let’s start with a base coat of deep forest green, allowing it to dry completely. “The key to perfect marble effects is patience between layers,” says celebrity nail artist Sandra Chen. We’ll then drop small amounts of our lighter green and white polishes onto the nail, using a thin nail art brush or toothpick to create gentle swirls. Don’t overwork the pattern – less movement creates more natural-looking marble veining.
For added dimension, we’ll carefully place tiny dots of metallic gold polish in select areas. Professional nail technician Mark Roberts notes, “The gold accents create depth and elevate the entire design.” Once you’re satisfied with the pattern, seal everything with a quick-dry top coat that’ll protect your masterpiece. The finished result combines holiday charm with elegant sophistication, perfect for everything from office parties to family gatherings.
Also Read: 25 Festive Thanksgiving Nails to Slay Your 2025
Winter Leaves

Three delicate holly leaves dance across each nail in this charming winter design. We’ll create this elegant look using a deep emerald green base and delicate hand-painted leaves that capture winter’s natural beauty.
To start, we’ll apply two coats of OPI’s “Christmas Gone Plaid” as our base color. “A rich forest green base provides the perfect canvas for detailed leaf work,” says celebrity nail artist Sarah Chen. Once dry, we’ll use a fine detail brush and white gel paint to outline three holly leaves on each nail, positioning them at slightly different angles for a natural appearance.
Next, we’ll fill in our leaves using a mixture of lighter green shades, creating depth with Essie’s “Off Tropic” and “Mojito Madness.” We’re adding tiny white highlights along the leaves’ edges to create dimension, and don’t forget those characteristic holly berries using a bright red gel dot. “The key to realistic winter leaves is varying the green tones and adding subtle shadowing,” notes master nail technician James Rodriguez. Finally, we’ll seal our artwork with a high-shine top coat to protect our festive design.
Emerald Negative Space

Negative space artistry meets holiday sophistication in this modern take on Christmas nails. We’re combining deep emerald polish with strategic bare spots to create a minimalist design that’s perfect for holiday gatherings and winter festivities.
To achieve this look, we’ll start with a clear base coat, letting it dry completely before applying striping tape in geometric patterns. Celebrity nail artist Maria Thompson suggests, “The key to perfect negative space is precise tape placement and clean lines.” We recommend using OPI’s ‘Christmas Gone Plaid’ or Essie’s ‘Off Tropic’ for that rich emerald tone.
Once you’ve placed your tape, apply two thin coats of polish, removing the tape while the second coat is still slightly wet. “This technique prevents polish from peeling at the edges,” explains nail technician Sarah Chen, who’s created looks for fashion week runways. We’ve found that adding a single rhinestone or metallic accent near the cuticle elevates the design without overwhelming it.
For longevity, seal your work with a quick-dry top coat, making sure to cap the free edge. This design typically lasts 7-10 days with proper application and maintenance.
Christmas Light Details

Festive nail art’s signature holiday touch comes alive with twinkling Christmas light details. We’ll show you how to create delicate, string-light effects that perfectly complement your green base color, using precision tools and expert techniques.
Start by applying a thin white striper polish, like OPI’s Alpine Snow, to create the light strand’s wire effect. “The key to realistic Christmas lights is varying the pressure on your striper brush,” says celebrity nail artist Maria Thompson, who’s worked on holiday magazine covers.
We’ll then dot small, rounded bulbs using a dotting tool and bright colors like yellow, red, and blue, keeping them evenly spaced along the white line.
To add dimension, we’re using a clear top coat with a small brush to create raised effects over each bulb, making them appear more three-dimensional. “A drop of quick-dry top coat on each light creates that authentic glass bulb look,” explains nail educator Sarah Chen.
Don’t forget to seal everything with a quality top coat like Seche Vite, which will protect your detailed work while adding extra shine to your festive design.
Green Velvet Texture
Looking to add rich depth to your holiday manicure? Let’s explore how to create a stunning green velvet texture that’ll make your nails look luxuriously festive this season.
We’ll start by applying a deep emerald green base coat, like OPI’s “Christmas Gone Plaid” or Essie’s “Off Tropic.” Once that’s dry, we’ll use magnetic nail polish in a similar shade to create the dimensional velvet effect. “The key to achieving authentic velvet texture lies in the proper use of magnetic particles,” explains celebrity nail artist Sarah Thompson, “hold the magnet at a 45-degree angle for 30 seconds while the polish is wet.”
To perfect this look, we’re going to apply the magnetic polish in thin layers, working one nail at a time. The trick is catching the light just right – when done correctly, you’ll see that signature shifting effect that makes velvet so mesmerizing. Finish with a quick-dry top coat, but don’t apply it too thickly, as we want to preserve the magnetic pattern. According to the International Nail Technicians Association, this technique can last up to 10 days with proper application and care.
Ornament Inspired

Sparkle and shine take center stage with ornament-inspired nail designs that capture the magic of beloved Christmas decorations. We’re bringing the tree’s most dazzling elements right to your fingertips, using metallic polishes and glitter topcoats that mimic those cherished glass baubles.
To create this festive look, we’ll start with a deep emerald green base coat, like OPI’s “Christmas Gone Plaid,” which celebrity nail artist Maria Thompson calls “the perfect canvas for ornament-inspired art.” Once that’s dry, we’ll apply micro-glitter in circular patterns to recreate that classic ornament sheen. For added dimension, we’re using a dotting tool to create tiny gold or silver accents that mimic ornament caps and hanging hooks.
Don’t forget to seal your masterpiece with a high-shine topcoat – we recommend Seche Vite’s Quick Dry formula, which gives that glass-like finish that’s essential for the ornament effect. “The key to achieving that authentic bauble look is layering different textures,” explains professional nail technician James Chen, who suggests adding a touch of holographic powder for extra holiday magic.
Sequined Green Tips

For a modern twist on holiday glamour, sequined green tips offer a stunning alternative to full-coverage designs. We’ll show you how to create this eye-catching look that’s perfect for holiday parties and winter celebrations.
Let’s start with a clean nail bed and apply a clear base coat. Once that’s dry, we’ll paint the tips with an emerald green polish like OPI’s “Christmas Gone Plaid” or Essie’s “Off Tropic.” Celebrity nail artist Tom Bachik says, “The key to perfect tips is using striping tape as a guide for clean lines.” After the green polish sets, we’ll apply a thin layer of clear polish to the tips and immediately sprinkle fine green sequins over them.
To achieve the best sparkle, we recommend using ultra-fine cosmetic-grade sequins rather than regular craft glitter. “The finer the sequin particle, the more sophisticated the result,” explains Rita Remark, Essie’s Global Lead Educator. Seal everything with two layers of top coat, making sure to wrap the tips to prevent chipping. The finished look gives us that perfect balance of festive charm and modern sophistication that’ll last throughout the holiday season.
Abstract Holiday Pattern

During the festive season, abstract holiday patterns let’s break free from traditional nail art while keeping the Christmas spirit alive. We’ll create a modern interpretation using various shades of green, metallic accents, and geometric shapes that hint at holiday motifs.
Let’s start with a deep forest green base coat, like OPI’s “Christmas Gone Plaid,” and wait for it completely dry. “Abstract patterns work best when you layer different elements with intention,” says celebrity nail artist Sarah Chen. We’ll use a striping brush to create angular tree shapes in emerald green, then add gold dots representing ornaments with a dotting tool. For dimension, we’ll incorporate small white triangles that suggest falling snow.
Don’t worry about perfect symmetry – that’s the beauty of abstract designs. We’re creating visual interest by mixing textures, like matte and glossy top coats. “The key is balancing negative space with bold elements,” notes Chen. Complete the look by sealing your design with a quick-dry top coat that’ll give your abstract holiday pattern lasting power through all your seasonal celebrations. Remember, abstract art is personal, so feel free to adjust these elements to match your style.
Pine Branch Art

For the pine needles, we’ll use a thin striper brush dipped in lighter green polish, making quick, short strokes outward from each branch. Don’t worry if they’re not perfect – nature isn’t!
Add dimension by dotting tiny amounts of white polish at branch intersections to suggest snow, and seal everything with a quality top coat. “The final clear coat shouldn’t just protect your design,” explains nail educator James Wong, “it should enhance the depth of your pine branches by adding subtle shine.”
Jewel Tone Gradient

Don’t forget to clean up the edges with an angled brush dipped in acetone for crisp lines. We’ll seal our gradient with two layers of top coat to smooth any texture and create that glass-like finish.
The result? A sophisticated take on holiday nails that master nail educator Sarah Williams calls “timelessly festive without being kitschy.”
Green Snowfall

For dimension, we’ll mix a drop of white paint with clear topcoat to create translucent snowflakes that appear to float between layers. Apply these strategically over your existing snowfall pattern, but don’t overdo it – we want the green gradient to remain visible.
Once you’re satisfied with the placement, seal your design with a quick-dry topcoat, making sure to cap the free edge to prevent chipping. The result is a sophisticated winter design that’s perfect for holiday celebrations.
Christmas Sweater Nails

Taking inspiration from cozy holiday knitwear, Christmas sweater nails bring charming winter patterns to your manicure. We’re seeing this trend explode on social media, with nail artists creating intricate Fair Isle patterns, reindeer motifs, and Nordic snowflakes in festive green shades.
To achieve this look, we’ll start with a forest green base coat like OPI’s “Christmas Gone Plaid” or Essie’s “Off Tropic.” Once that’s dry, we’ll use a fine detail brush and white nail polish to create the sweater-inspired patterns. “The key to realistic sweater nails is building the design with tiny dots and lines,” explains celebrity nail artist Sarah Thompson, who recommends using a dotting tool for precise results.
We can’t forget about texture – a matte top coat gives these designs that cozy, knit-like finish we’re after. For added dimension, try alternating between glossy and matte finishes on different nails. If you’re new to nail art, start with simple geometric patterns like diamonds or zigzags, then work your way up to more complex designs. Remember, imperfect lines actually add to the hand-knitted charm of these sweater-inspired nails.
Foiled Green Tips

Looking to add some metallic magic to your holiday manicure? Foiled green tips offer a sophisticated twist on the classic French manicure, perfect for celebrating the season with understated elegance.
We’ll start with a neutral base coat, and then we’re going to apply metallic green foil to the tips using a specialized adhesive. Celebrity nail artist Maria Chen recommends, “Always use a gel-based adhesive for foils, as regular nail glue won’t give you that seamless finish we’re aiming for.” For the best results, we’re using ORLY’s “Evergreen Dreams” as our base color, paired with Minx Green Chrome foils for the tips.
After your base coat dries completely, apply thin strips of nail tape to create perfect smile lines. Next, we’ll brush on the foil adhesive and wait 30 seconds until it becomes tacky. Press the foil firmly against the tips, then peel back slowly at a 45-degree angle. “The key is patience during the removal process,” explains master technician James Liu. Finally, seal everything with a non-smudging top coat to preserve your festive tips throughout the holiday season.
Festive Green Dots

With holiday cheer in mind, polka dots add a playful pop to traditional green Christmas manicures. We’ll create this festive look using a combination of metallic and matte green dots that’ll catch everyone’s attention at holiday gatherings.
Let’s start with a clean base coat, followed by two thin layers of classic white polish, allowing each coat to dry completely. “The key to perfect dots is using proper dotting tools and maintaining consistent pressure,” says celebrity nail artist Maria Chen. We’ll use dotting tools in three sizes to create varied green spots, starting with our darkest shade, ‘Emerald Forest,’ for the largest dots. Working systematically, we’ll add medium dots in ‘Holly Berry Green’ and small dots in ‘Mint Frost’ metallic.
For extra dimension, we can mix in a few gold dots using Essie’s ‘Good as Gold,’ which nail expert Sarah Williams calls “the perfect accent for holiday designs.” Remember to seal your work with a quality top coat, and don’t worry if your dots aren’t perfectly uniform – slight variations add character to this whimsical design.
Frequently Asked Questions
How Long Do Green Christmas Nail Designs Typically Last Before Chipping?
We find that festive green nail designs typically last 7-10 days with quality polish and topcoat. If you’re using gel polish, you’ll get 2-3 weeks of chip-free wear from your holiday manicure.
Can These Nail Designs Be Done With Regular Polish Instead of Gel?
Yes, we can create these festive designs with regular polish, though they won’t last as long as gel. We’d recommend using a quality base coat and top coat to help extend their wear time.
What Base Coat Works Best for Preventing Green Polish From Staining Nails?
We recommend using a ridge-filling base coat that’s specifically stain-resistant. Our top picks are OPI’s Nail Envy and Orly’s Bonder. They’ll create a strong barrier that prevents green polish from staining your nails.
Are These Designs Suitable for Natural Nails or Only Artificial Ones?
We can create most holiday nail designs on both natural and artificial nails. While longer artificial nails offer more canvas space, we’ll help you adapt festive patterns to work beautifully on your natural nails too.
How Much Do Professional Green Christmas Nail Designs Usually Cost at Salons?
We typically see festive holiday nail designs at salons costing between $40-80, depending on complexity. You’ll pay more for detailed art, gems, or 3D elements, while simple patterns cost less.
Conclusion
We’ve explored these 26 green Christmas nail designs that’ll transform your holiday manicure game. Whether you’re drawn to the timeless appeal of evergreen French tips or ready to experiment with glittering emerald swirls, there’s something here for every style preference. Let’s embrace these festive options, from subtle holly accents to bold geometric patterns, and show off our holiday spirit right down to our fingertips.