
As October ushers in the season of enchantment, nail enthusiasts are embracing sophisticated takes on traditional Halloween motifs. From elegant black cat silhouettes to shimmering cobweb tips, this year’s autumn nail designs strike a perfect balance between spooky and sophisticated. Professional nail artists are reimagining classic Halloween elements with modern techniques, incorporating metallic finishes, subtle gradients, and precise line work to create wearable art that shifts effortlessly from office to evening festivities. Whether you prefer minimalist ghost designs or elaborate haunted house scenes, these 21 carefully curated ideas offer something for every style sensibility.
Black Cat Silhouette Nails

Looking for a purr-fectly spooky yet sophisticated nail design? Black cat silhouette nails have become increasingly popular among nail artists and enthusiasts, offering a subtle nod to Halloween while maintaining everyday wearability.
Celebrity nail artist Marina Thompson notes, “The key to achieving the perfect black cat silhouette is starting with a neutral base, typically a pale gray or muted lavender, allowing the cat design to really pop.” Begin with two coats of your chosen base color, letting each layer dry completely. For the silhouette, use a fine-tipped nail art brush dipped in black gel polish to carefully outline the cat’s shape, starting with the pointed ears and working downward.
“The most common mistake is overcrowding the nail,” explains professional technician Sarah Chen, who recommends placing the silhouette slightly off-center for visual interest. Complete the look with a high-shine top coat, such as Seche Vite Quick Dry, to seal the design. For added dimension, incorporate a subtle gradient background or position the cats at different angles across accent nails, creating an elegant yet playful Halloween-inspired manicure.
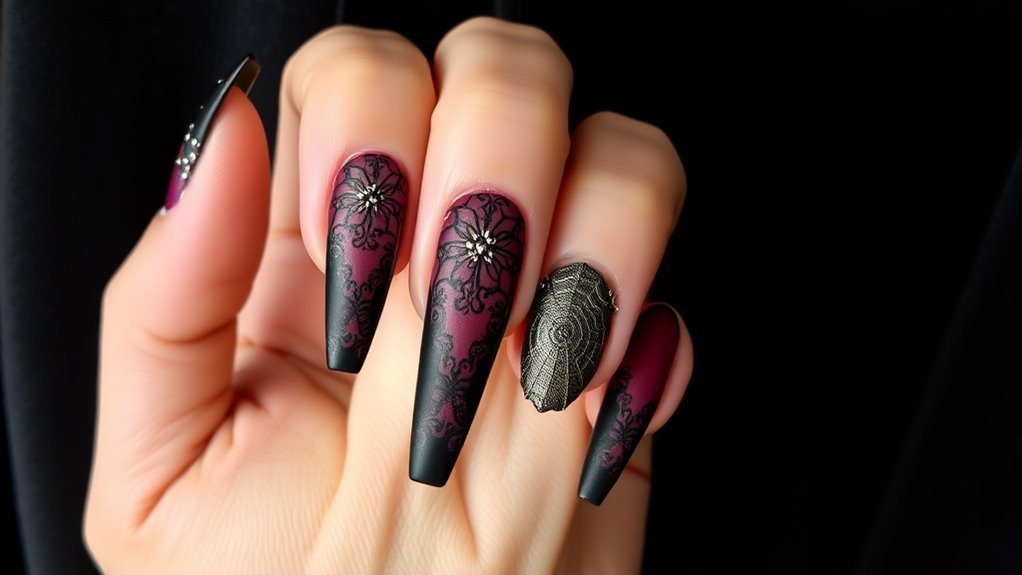
Glittering Cobweb Tips

For best results, use products like OPI’s “Diamond Dust” or Essie’s “Set in Stones” for the sparkle effect. Seal your spooky masterpiece with a quick-dry top coat, ensuring the delicate web design remains intact.
This Halloween-inspired look works particularly well on almond or stiletto-shaped nails, though it can be adapted for any nail shape with proper technique and patience.
Pumpkin Patch French Manicure

The secret to long-lasting Halloween nail art is in the proper sealing technique,” explains Susan Wong, lead educator at The Nail Academy. Apply a clear top coat, ensuring it covers both the design and natural nail completely.
For added dimension, consider incorporating subtle green vine details between the pumpkins or adding a touch of gold shimmer to enhance the autumn aesthetic. This sophisticated yet festive design typically lasts 2-3 weeks with proper care.
Haunted House Accent Nails

Popular products for this design include ORLY’s “Liquid Vinyl” for the house silhouette and Essie’s “Set in Stones” for creating ethereal fog effects.
Advanced artists can incorporate texture using magnetic gel polishes for a mysterious night sky effect, while beginners might prefer using nail stamping plates specifically designed for Halloween motifs.
Remember to seal your spooky masterpiece with a high-shine top coat, ensuring your haunted house maintains its eerie elegance throughout the Halloween season.
Metallic Ghost Design

Modernizing classic Halloween motifs, metallic ghost designs combine whimsical spirits with sophisticated shimmer for an elegant October manicure. Using chrome powders and pearlescent top coats, nail artists create ethereal ghost figures that seem to float across a darker base color, typically in midnight blue or black.
Celebrity nail artist Tom Bachik explains, “The key to achieving the perfect metallic ghost design lies in the layering technique and proper application of the chrome powder.” Start with two coats of dark polish as your base, then use a thin brush to paint ghost shapes with white gel polish. Once cured, apply silver chrome powder over the ghosts using a silicone tool, focusing on creating dimension through selective application.
For best results, celebrity manicurist Julie Kandalec recommends LUXAPOLISH Chrome Powder in “Celestial Silver” paired with their no-wipe top coat. “The combination creates that perfect ghostly glow while maintaining the design’s integrity,” notes Kandalec. Finish with a matte top coat on the base color to make your metallic ghosts appear to hover dramatically against the darkness.
Also Read: 8 Birthday Nail Designs Perfect for Your Special Day
Blood Drip Tips

For added dimension, incorporate darker red shades near the base of each drip, and seal with a high-shine top coat.
Advanced artists might consider adding subtle shimmer or metallic accents to create a wet-look effect that catches the light, making the design appear more realistic and three-dimensional.
Candy Corn Ombré

For best results, apply thin layers and allow each color to dry partially before blending the next shade. Seal your work with a high-shine top coat to prevent smudging and extend wear time.
This versatile design works equally well on natural or artificial nails, and according to the International Nail Technicians Association, it’s among the top five most-requested Halloween nail designs in professional salons.
Witchy Moon Phases

For added dimension, incorporate subtle glitter accents using a fine-grade holographic powder between phases. Seal your celestial masterpiece with a high-shine top coat, allowing each layer to dry completely.
This design typically lasts 7-10 days with proper application and maintenance, making it perfect for all your October festivities, from casual pumpkin picking to elegant Halloween soirées.
Also Read: 25 Festive Thanksgiving Nails to Slay Your 2025 Holiday Look
Autumn Leaf Gradient

Creating a stunning autumn leaf gradient transforms your nails into a miniature canvas of fall foliage. This sophisticated design captures the essence of changing seasons, blending warm oranges, deep reds, and golden yellows in a seamless shift that mimics nature’s palette.
Professional nail artist Maria Chen, who specializes in seasonal designs, recommends starting with a neutral beige base coat before building the gradient. “The key to a perfect leaf gradient is layering your colors from lightest to darkest using a makeup sponge,” explains Chen. Begin with a pale yellow, followed by burnt orange, and finish with a deep burgundy, dabbing the colors gently to achieve that sought-after ombré effect.
To enhance the leaf effect, use a thin striper brush to add delicate veining in metallic gold or bronze. Top nail brands like OPI’s “Leaf Me Alone” collection and Essie’s “Fall Line” offer ideal shade combinations for this look. Seal your design with a high-quality top coat, which nail technician Sarah Wu notes “not only protects the artwork but adds dimension to the gradient, creating that realistic fallen leaf appearance.”
Spooky Forest Scenery

For added ethereal effects, incorporate wisps of gray or purple “fog” using a dry-brush technique near the base of the trees. Complete the look with a scattered placement of tiny dots in glow-in-the-dark polish to mimic fireflies or spirit orbs.
Seal your spooky masterpiece with a high-quality top coat, such as Seche Vite, which nail professionals consistently recommend for its glass-like finish and extended wear.
Gothic Lace Pattern
Delicate webs of black lace adorning your nails create an elegant gothic aesthetic perfect for October celebrations. This sophisticated design, favored by professional nail artists like Maria Henderson of Gothic Glamour Studios, combines intricate patterns with a timeless dark allure.
To achieve this look, start with a neutral base coat in cream or pale pink, allowing it to dry completely. Using a fine-tipped nail art brush, create delicate black lines in crisscrossing patterns, mimicking vintage lace designs. “The key to authentic gothic lace is varying the thickness of your lines and incorporating small florals or scrollwork,” explains Henderson, who recommends using Essie’s Licorice or OPI’s Black Onyx for ideal coverage.
For added dimension, consider incorporating subtle metallic accents using a gunmetal striper polish, or apply a matte top coat for an authentically vintage appearance. Professional nail technician Sarah Chen suggests using stamping plates specifically designed for lace patterns if you’re new to detailed nail art. “Brands like MoYou London offer excellent gothic-inspired plates that make intricate lace patterns achievable for everyone,” she notes.
Spider Web Chrome

Metallic threads of chrome polish transform traditional spider web designs into stunning, dimensional nail art. This trending technique combines the spooky appeal of classic Halloween webs with modern chrome powder’s reflective properties, creating a mesmerizing effect that catches light from every angle.
Celebrity nail artist Maria Torres explains, “The key to achieving the perfect spider web chrome is starting with a jet-black base coat and using ultra-thin striping brushes for web details.” Apply two coats of black gel polish, cure completely, then create thin white web lines using a detail brush. Once the design is set, gently buff chrome powder over the entire nail using a silicone applicator, focusing on even distribution.
For best results, use products specifically designed for chrome effects, such as OPI’s Chrome Effects Powder or MODELONES Chrome Nail Powder Set. “Seal the design with a no-wipe top coat to prevent smudging and maintain the metallic finish,” recommends professional technician James Chen, adding that the look typically lasts 2-3 weeks with proper application. This sophisticated take on Halloween nail art works equally well for both short and long nail lengths.
Flying Witch Silhouettes

For added dimension, incorporate tiny stars or wisps of clouds using metallic silver polish.
Many artists opt for a gradient background, blending dark purple into midnight blue to create a mystical sky effect.
Remember to seal your design with a quality top coat, such as Seche Vite, to guarantee your flying witches stay perfectly perched throughout the spooky season.
Skull and Rose Art

For best results, paint the skull design first in white, then add shading with gray and black.
Create roses by starting with darker pink dots and swirling outward with lighter shades. A matte top coat like Seche Vite’s Velvet gives the design an antique feel, while small rhinestone accents can add subtle sparkle to the rose centers or skull eyes.
Orange Glitter Fade

A dazzling orange glitter fade brings autumn’s warmth to your fingertips with a gradient that shifts from solid orange at the base to sparkling glitter at the tips. This eye-catching design, favored by celebrity nail artist Tom Bachik, combines the season’s signature color with festive sparkle for a versatile look that works from October through Thanksgiving.
To achieve this gradient effect, start with a bright orange base color like OPI’s “It’s Now or Never” or Essie’s “Playing Koi.” Once dry, use a makeup sponge to dab on orange glitter polish, starting heavily at the tips and gradually decreasing intensity toward the cuticle. “The key is layering multiple thin coats of glitter polish for seamless blending,” explains Sarah Thompson, lead educator at The Nail Academy.
For best results, seal your design with two layers of clear top coat, focusing particularly on the glitter portions to guarantee a smooth finish. This technique not only protects your artwork but also enhances the sparkle effect, making your nails catch the light with every movement. The design typically lasts 10-14 days with proper application and care.
Mysterious Potion Bottles

Finish each bottle design with miniature labels using white polish and a dotting tool, adding crystalline embellishments or glitter accents for extra sparkle.
Seal your mystical creation with a high-quality top coat, ensuring your potion bottles remain pristine throughout the spooky season.
For best results, use gel polish alternatives that offer extended wear time.
Black Widow Details

For the signature red hourglass marking, apply a tiny dot of scarlet polish using a dotting tool or toothpick. “Seal your design with a high-gloss top coat, but apply it gently to avoid smudging the intricate details,” advises Henderson.
For added dimension, consider incorporating subtle web designs in the background using a metallic silver polish, keeping them minimal to maintain focus on your eight-legged masterpiece.
Graveyard Mist Effects

For the finishing touch, apply a thin layer of pearl-finish topcoat mixed with a drop of gray polish. Using a thin striping brush, create wispy tendrils extending from the misty center.
Professional nail educator Sarah Martinez recommends, “Add tiny dots of white polish using a dotting tool to create floating orbs that suggest spiritual energy.” Seal everything with a matte topcoat to enhance the ethereal effect and guarantee your spooky masterpiece lasts through Halloween festivities.
Batty Purple Accents

Create dramatic contrast by pairing deep purple polish with miniature bat silhouettes on an accent nail. Celebrity nail artist Maria Thompson suggests using OPI’s “Good Girls Gone Plaid” or Essie’s “Kimono-Over” as rich purple base colors that perfectly capture the Halloween spirit while maintaining sophistication.
For the bat accent nail, start with a lighter purple or silver base coat, allowing it to dry completely. According to professional nail technician Sarah Chen, “The key to crisp bat silhouettes is using high-quality nail art brushes and allowing adequate drying time between layers.” Apply tiny bat designs using either black nail art polish or decals, spacing them evenly across the accent nail. For added dimension, incorporate small rhinestones or metallic studs between the bats.
Seal your design with a quick-dry top coat that provides both shine and durability. “A quality top coat like Seche Vite won’t smudge your detailed work and preserves your Halloween-inspired manicure up to two weeks,” notes Thompson. This look works particularly well on almond or coffin-shaped nails, where the elongated surface provides ample space for the bat motifs.
Halloween Plaid Design

Plaid patterns offer a sophisticated alternative to conventional Halloween designs while maintaining the season’s festive spirit. By combining traditional autumn colors like burnt orange, deep purple, and forest green with classic plaid patterns, you’ll create an elevated Halloween look that’s both stylish and seasonally appropriate.
Celebrity nail artist Maria Henderson suggests starting with a neutral base coat, preferably in a warm beige or soft gray, to guarantee the plaid lines pop. “The key to perfect plaid is using a thin striping brush and working in layers,” explains Henderson. Begin by painting horizontal lines in your chosen Halloween shade, allowing each stripe to dry completely before adding vertical ones. For an authentic October twist, incorporate metallic accents in copper or gold between the crosshatches.
Professional nail technician James Chen recommends the Orly Striper Brush for precise lines and notes, “Halloween plaid works best when you alternate between matte and glossy finishes.” Complete the look by sealing your design with a quick-dry top coat, such as Seche Vite, which prevents smudging and extends wear time up to ten days.
Cauldron Bubble Art

For the cauldron’s contents, blend emerald and lime green gel polishes to create that signature witch’s brew effect. Top-rated products for this design include GELISH Structure Gel for bubbles and The GelBottle’s “Poison Apple” for the perfect potion shade.
While intricate, this design typically lasts 2-3 weeks with proper application and top coating, making it an investment-worthy choice for Halloween season festivities.
Conclusion
These sophisticated October nail designs offer a perfect balance between seasonal whimsy and elegant style. From the subtle sophistication of Black Cat Silhouettes to the eye-catching sparkle of Glittering Cobweb Tips, each design captures Halloween’s spirit while maintaining professional polish. Professional nail artists confirm these trends are highly requested in salons nationwide. The versatile collection provides options for both subtle statement pieces and bold artistic expression, making seasonal nail art accessible for every style preference and skill level.