
Orange nail designs have emerged as a striking choice for those seeking to make a bold statement with their manicures. This vibrant hue, ranging from subtle peach to electric tangerine, offers versatility that extends far beyond basic solid colors. Whether incorporated into sophisticated French tips, ethereal marble patterns, or playful fruit-inspired motifs, orange brings an undeniable energy to nail artistry.
As we explore twenty distinctive designs, from minimalist geometric patterns to elaborate sunset gradients, it becomes clear that this often-overlooked shade deserves a prominent place in contemporary nail fashion. Let’s discover how this dynamic color can transform your next manicure.
Classic Orange French Tips

For best results, seal your design with a high-quality top coat, such as Seche Vite Quick Dry, which prevents chipping and adds shine. “The key to long-lasting French tips is in the preparation and finishing touches,” explains Jennifer Davis, founder of Polish Perfect Academy.
This versatile design works equally well for both professional settings and casual occasions, lasting up to two weeks with proper application and maintenance.
Sunset Gradient Ombre

For best results, seal your sunset gradient with a high-shine top coat like Seche Vite or OPI Infinite Shine.
The finished look should mirror the subtle color shifts of a real sunset, with each shade flowing naturally into the next, creating a sophisticated yet eye-catching manicure that works for any occasion.
Orange Marble Swirls

With their hypnotic patterns and flowing designs, orange marble swirls create a luxurious and sophisticated nail art look. The technique combines vibrant orange shades with white or metallic accents, resulting in unique patterns that mimic natural marble’s distinctive veining.
Professional nail artist Sarah Chen explains, “The key to achieving perfect marble swirls lies in the water-marbling technique, where polish is dropped into room-temperature water and manipulated with a fine-tipped tool.” To create this effect, start with a white base coat, then drop alternating dots of orange and white polish into a small container of water. Using a toothpick or nail art tool, gently swirl the colors together to create your desired pattern before dipping your nail in at a 45-degree angle.
For best results, celebrity manicurist Jessica Mills recommends using high-quality gel polishes like OPI’s “Orange You Fantastic” and “Alpine Snow” for ideal color saturation and lasting power. The final look can be enhanced with a glossy top coat, which not only seals the design but also adds depth to the marble effect, making it appear more realistic and dimensional.
Citrus Fruit Accent Nails

For enhanced realism, incorporate small green leaves at the nail’s base using Sally Hansen’s “Sour Apple,” and seal everything with a high-gloss top coat. The design works particularly well on ring fingers or thumbs, where the larger nail surface provides adequate canvas space for detailed citrus representations.
Many salons report this design being especially requested for beach vacations and summer weddings.
Geometric Orange Patterns

For more intricate designs, consider incorporating negative space techniques, where bare nail shows through geometric cutouts. “The combination of orange geometrics with negative space creates a sophisticated, architectural effect,” explains nail art educator Jessica Martinez.
Use a thin detail brush for precise edges, and seal your design with a high-gloss top coat like Seche Vite for longevity. Remember to let each layer dry completely before applying striping tape to prevent smudging or bleeding.
Neon Orange Glitter Mix

For best results, seal the design with two layers of quick-dry topcoat, guaranteeing the glitter remains securely embedded.
This technique works particularly well for accent nails or full sets, making it versatile enough for both subtle and bold statement looks.
The combination of neon and sparkle guarantees your manicure remains a conversation starter.
Floral Orange Blooms

Add dimension to your blooms by incorporating complementary colors, such as sage green leaves or white accent dots. Professional nail technicians recommend using a dotting tool for precise center points and a thin brush for delicate stem details.
Seal your floral masterpiece with a high-quality top coat, ensuring your orange blooms remain fresh and vibrant for up to two weeks.
Orange Leopard Print
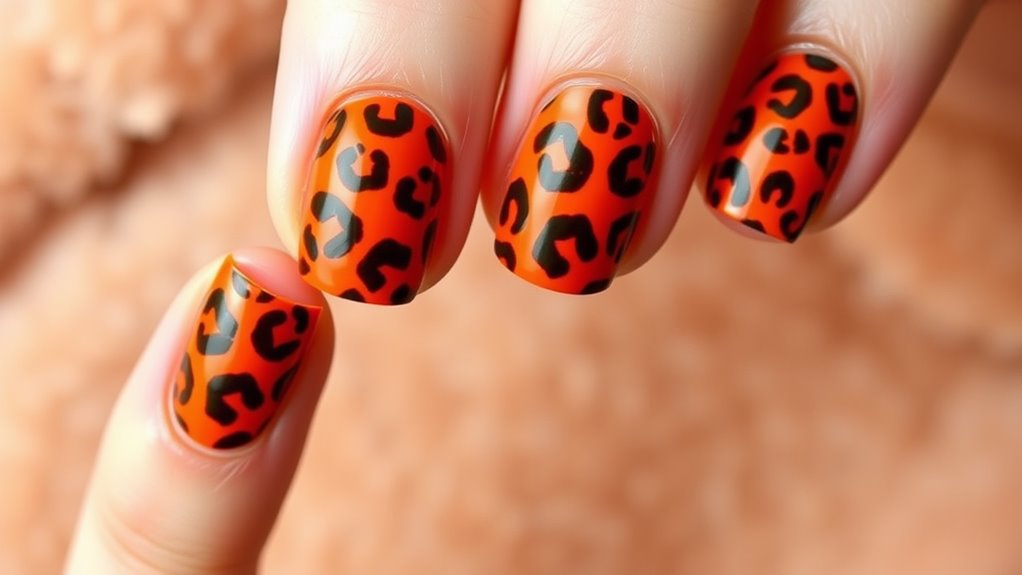
Complete the look by outlining each spot with a darker orange or deep brown shade, creating that distinctive leopard print border. For added dimension, consider incorporating metallic accents or a matte top coat.
This versatile design works particularly well as an accent nail paired with solid orange companions, or go bold with a full set of spotted tips that command attention while remaining surprisingly wearable for both casual and formal occasions.
Tangerine and Gold Stripes

Next, carefully paint gold metallic polish, like Zoya’s “Ziv” or Sally Hansen’s “Gold Standard,” over the exposed areas. Remove the tape while the gold polish is still slightly wet to prevent peeling.
Seal your design with a high-gloss top coat, which not only protects the pattern but also enhances the metallic shine. For best results, allow each layer to dry thoroughly between applications.
Burnt Orange Abstract Design

Creativity flourishes with this edgy burnt orange abstract design that combines artistic freedom with seasonal sophistication. Using a deep, rustic orange shade like OPI’s “It’s a Piazza Cake” as your base, this look incorporates free-form brushstrokes and organic shapes that capture autumn’s artistic spirit.
Celebrity nail artist Maria Thompson notes, “Abstract designs allow for imperfect perfection, making them ideal for both beginners and experienced nail enthusiasts.” To achieve this look, start with two coats of burnt orange polish, then use a fine detail brush to create irregular geometric shapes using complementary colors like copper, bronze, and matte black. The key is embracing asymmetry while maintaining a cohesive flow across all nails.
For added dimension, incorporate negative space techniques by leaving small portions of the natural nail exposed within your design. Seal your artwork with a high-quality top coat like Seche Vite, which nail technician James Chen recommends “for its glass-like finish and exceptional durability.” This sophisticated yet edgy design works particularly well for fall events, professional settings, and creative workspaces where artistic expression is welcomed.
Also Read: 17 Butter Yellow Nail Designs
Orange Crystal Effects

For enhanced dimension, incorporate crushed glass particles or crystal-effect powder in complementary shades like copper or gold. The final look can be customized with varying levels of transparency, from subtle shimmer to bold, faceted effects.
Seal the design with a high-shine gel topcoat, ensuring the crystal elements remain securely in place while maintaining their brilliant, three-dimensional appearance.
Negative Space Orange Art

The key to successful negative space designs lies in precise application and clean lines. Create minimalist shapes like triangles, crescents, or diagonal stripes, ensuring crisp edges by carefully peeling away guides while polish is semi-wet.
For added sophistication, incorporate thin orange lines against natural nail backgrounds, or experiment with gradients that fade into bare nail sections. Remember to seal your design with a quality top coat to prevent chipping and maintain the sharp contrast between polished and unpolished areas.
Orange Halloween Accents

Popular Halloween accent options include tiny white ghosts floating on an orange background, black cat silhouettes perched on accent nails, or intricate spider webs stretching across orange tips.
For added dimension, consider using metallic gold striping tape to outline pumpkin shapes or create geometric patterns. Finish with a high-shine top coat like Seche Vite to seal your spooky masterpiece and extend wear time.
Peach Pastel Dreams

Popular peach pastel designs include watercolor effects, achieved by dabbing diluted polish with a makeup sponge, and gradient shifts that blend peachy tones with cream or white.
For a modern twist, consider adding minimal geometric accents using rose gold striping tape or delicate white line work. These understated elements complement the soft peach base while maintaining the manicure’s dreamy aesthetic, making it perfect for both professional settings and special occasions.
Orange Chrome Finish

For best results, seal the chrome finish with two thin layers of gel top coat, curing between applications. “The key to long-lasting chrome nails lies in proper sealing technique,” explains nail technician Sarah Chen, who suggests using a rubber base coat underneath for enhanced durability.
This stunning finish typically lasts 2-3 weeks with proper maintenance and can be enhanced with minimal nail art or worn as a statement look on its own.
Retro Orange Waves

For added dimension, incorporate a deeper orange shade like China Glaze’s “Orange Knockout” to create parallel waves that complement the brighter lines. Finish with a high-gloss top coat to seal the design and enhance the retro sheen.
This throwback style pairs particularly well with summer outfits and festival wear, making it a versatile choice for warm-weather occasions.
Orange Butterfly Wings

For best results, apply a clear topcoat between layers to achieve that gossamer-like wing effect. Professional artists recommend using quick-dry drops to prevent smudging between stages.
The final design should feature symmetrical patterns on paired nails, though slight variations add authenticity. Complete the look with a scatter of tiny rhinestones or pearl accents to capture light, mimicking the natural iridescence of real butterfly wings.
Minimalist Orange Lines

Clean, geometric lines in orange create striking yet understated nail designs perfect for both casual and formal occasions. According to celebrity nail artist Maria Chen, “Minimalist orange lines have become increasingly popular because they offer sophistication while maintaining visual interest.” The key to achieving these designs lies in using high-quality striping tape and precise application techniques.
To create this look, start with a neutral base coat, preferably in beige or white, allowing it to dry completely. Using ultra-thin striping tape or a precision brush, draw diagonal lines, horizontal stripes, or geometric patterns using vibrant orange nail polish. “For the cleanest lines, I recommend OPI’s ‘Fresh Squeezed’ or Essie’s ‘Serial Shopper,'” suggests professional manicurist James Rodriguez, who works with several A-list celebrities.
The beauty of minimalist orange lines lies in their versatility – they can be as simple as a single diagonal stripe or as complex as an interconnected geometric pattern. For best results, seal your design with a quick-drying top coat, applying it in thin, even strokes to prevent smudging and extend the life of your manicure.
Orange Tie-Dye Swirls

For best results, use gel polishes like OPI’s “Freedom of Peach” and Essie’s “Playing Koi” for longer-lasting wear. The swirls can be customized from subtle to dramatic by varying the density of the patterns and incorporating complementary colors like white or gold for dimension.
Remember to clean your brush between colors to maintain pattern clarity.
Orange Splatter Art

For best results, protect surrounding skin with liquid latex or petroleum jelly before starting the splatter process.
Top brands like OPI’s “Summer Sunset” and Essie’s “Playing Koi” offer ideal orange shades for this technique. Once satisfied with the pattern, seal the design with a high-gloss topcoat to smooth any texture and guarantee longevity.
Remember to work in a well-ventilated area and protect surfaces from potential polish splatter.
Conclusion
The diverse array of vibrant orange nail designs offers endless possibilities for creative self-expression through nail art. From classic French tips to intricate marble swirls, these eye-catching looks combine technical precision with artistic flair. Whether opting for minimalist lines or elaborate butterfly patterns, orange nail designs provide a bold statement that brightens any manicure. The versatility of these designs, coupled with their ability to complement various skin tones, makes them an excellent choice for year-round wear.